■ 中文版链接:Norwii Presenter for macOS使用说明书
■ When the USB receiver is plugged into the USB port of a macOS computer for the first time, we need to use Keyboard Setup Assistant to set the keyboard type for the USB receiver. Click this link to see the steps.
■ Download the PDF format of this manual:![]() Norwii Presenter for macOS User Manual 2024-08-09.pdf
Norwii Presenter for macOS User Manual 2024-08-09.pdf
I. Definition
Norwii Presenter is a software which has Windows version, macOS version and Android version. Button is a part of the Norwii presenter software which can be clicked by mouse.
Wireless presenter is a physical device which has page down/up keys and a USB receiver.
Key is a part of the wireless presenter which is plastic or metal.
We usually call the wireless presenter without Highlight, such as the page up/down, support for volume control and hyperlink function, simple function wireless presenter; The wireless presenter with Highlight function is called Highlight wireless presenter.
II. Software downloads and installation
1. Please go to the official website of Norwii https://www.norwii.com, "Support", "Downloads" to download and install the Norwii Presenter software. The software downloads section includes an exe file used by windows, a dmg file used by macOS and an apk file for Android. As shown in the figure.
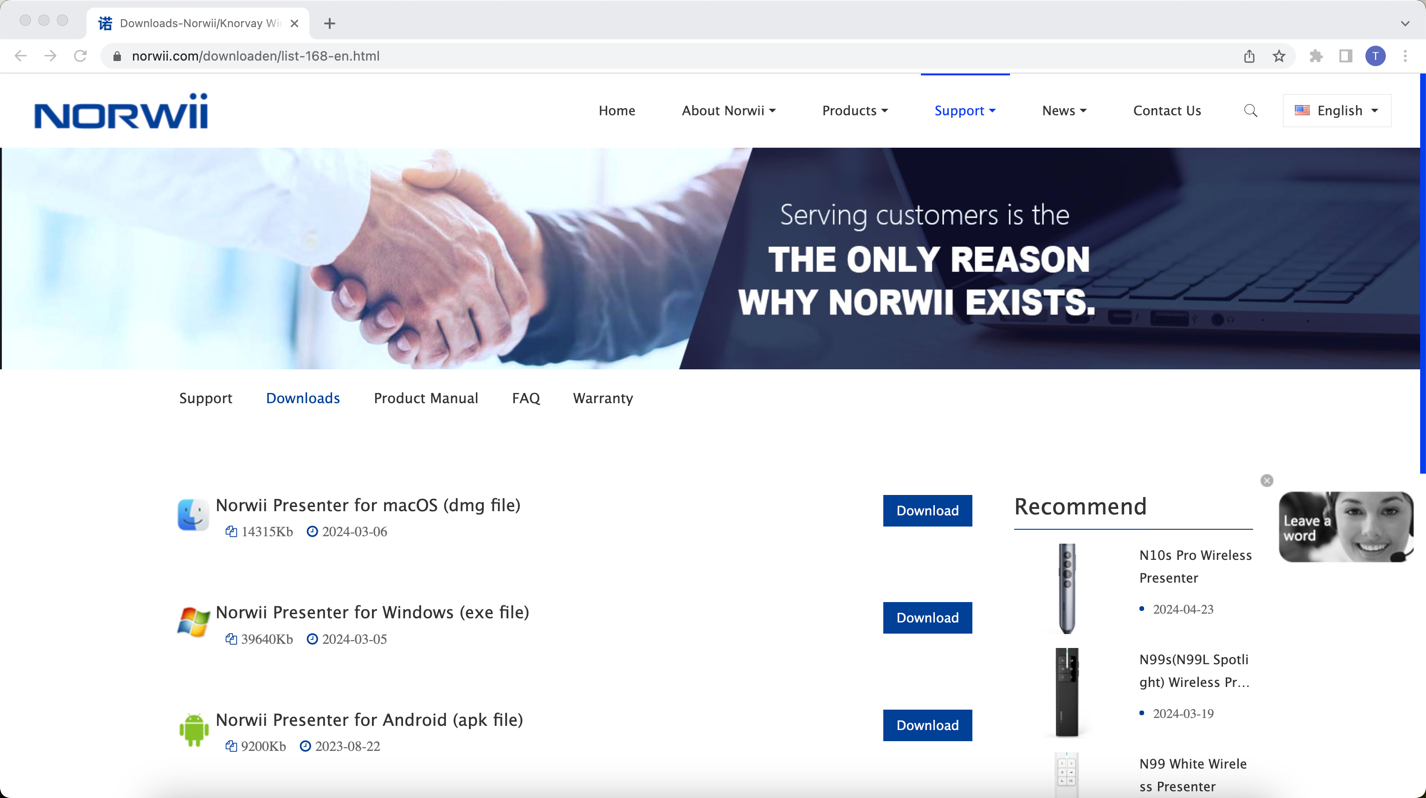
Figure 1
2. You can also use the following URL to download the dmg file for macOS directly:
https://www.norwii.com/downloads/presenter/mac/norwiipresenter.dmg
3. Open the software after downloading and drag the icon from the left to the right to install. If an earlier version of this software has been installed, select Replace in the window that appears.

Figure 2
4. When opening, you may need to confirm to open it, please click “Open”.

Figure 3
5. After the software is installed and started, you will be prompted to open the Privacy & Security settings required by the system, please click “Open System Settings”, as shown in the figure.

Figure 4
6. This software requires three permissions: Input Monitoring, Screen & System Audio Recording, Accessibility. If you have not set all the settings before, please click on “Grant permissions” in the "About" tab, and then open “Privacy & Security settings” window.
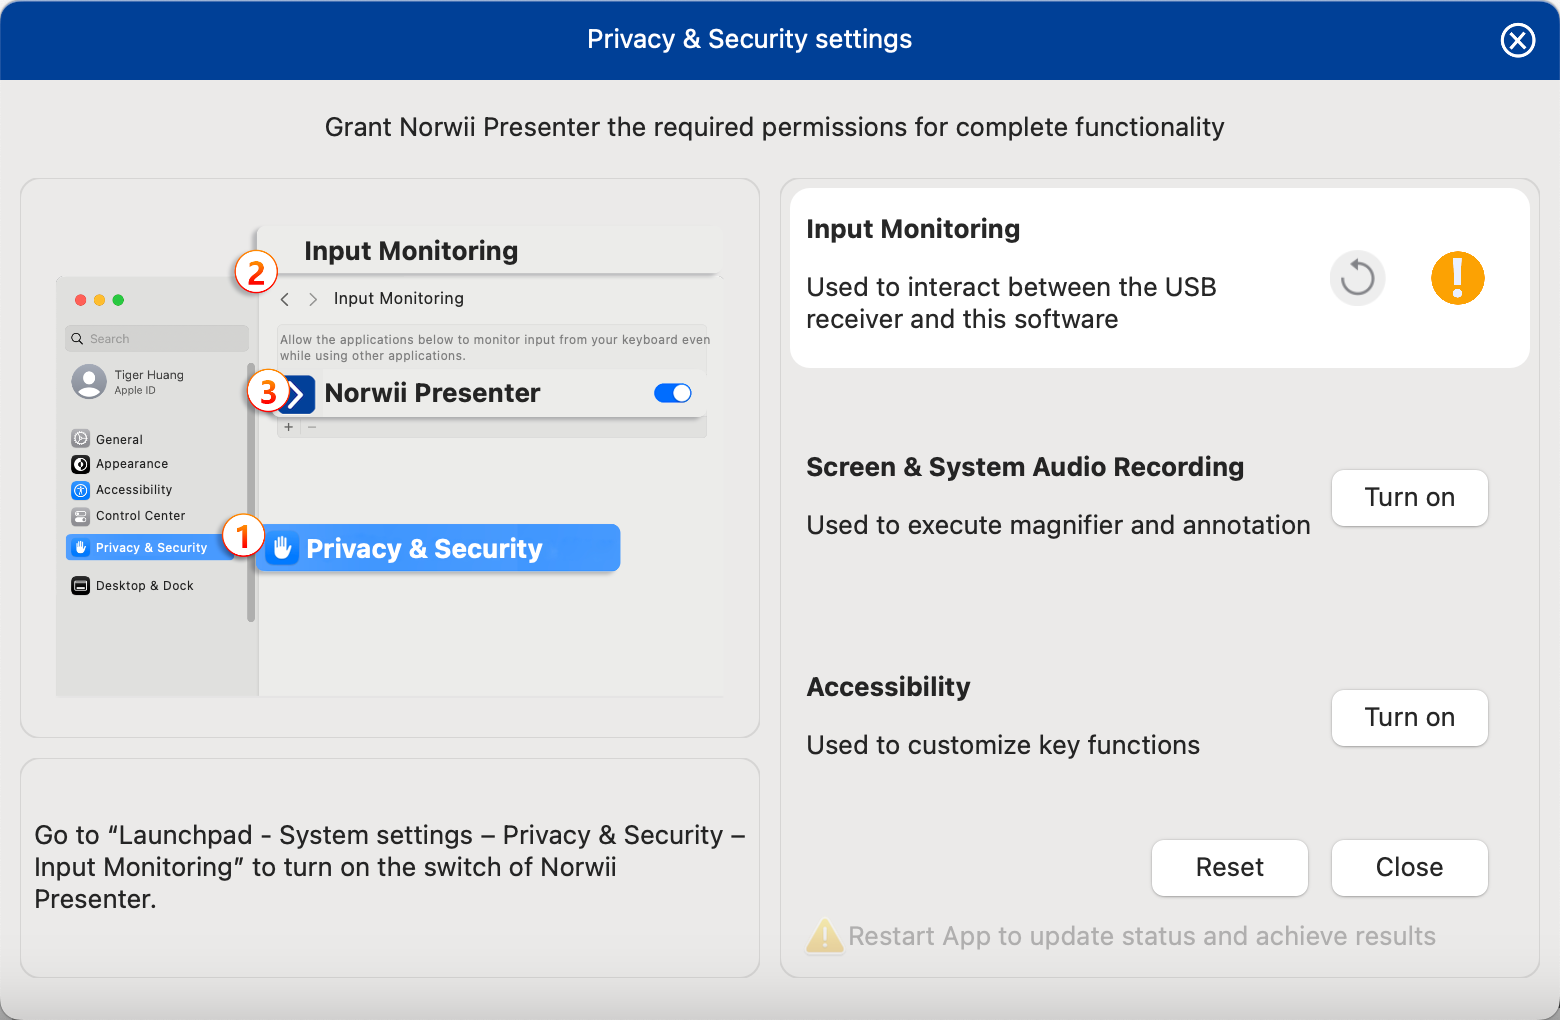
Figure 5
7. Click “Turn on” button beside “Input Monitoring” on “Privacy & Security settings” window, or go to “Launchpad - System settings – Privacy & Security –Input Monitoring” to turn on the switch of Norwii Presenter as shown in the figure. The macOS may pop up a verification window asking you to enter user password or fingerprint authentication. After turning on the option switch, you will be required to quit and reopen Norwii Presenter, click "Quit & Reopen".

Figure 6
8. Click “Turn on” button beside “Screen & System Audio Recording” on “Privacy & Security settings” window, or go to “Launchpad - System settings – Privacy & Security –Screen & System Audio Recording”, to turn on the switch of Norwii Presenter as shown in the figure. The macOS may pop up a verification window asking you to enter user password or fingerprint authentication. After turning on the option switch, you will be required to quit and reopen Norwii Presenter, click "Quit & Reopen".

Figure 7
9. Click “Turn on” button beside “Accessibility” on “Privacy & Security settings” window, or go to “Launchpad - System settings – Privacy & Security – Accessibility”, to turn on the switch of Norwii Presenter as shown in the figure. The macOS may pop up a verification window asking you to enter user password or fingerprint authentication. After turning on the option switch, you will be required to quit and reopen Norwii Presenter, click "Quit & Reopen".
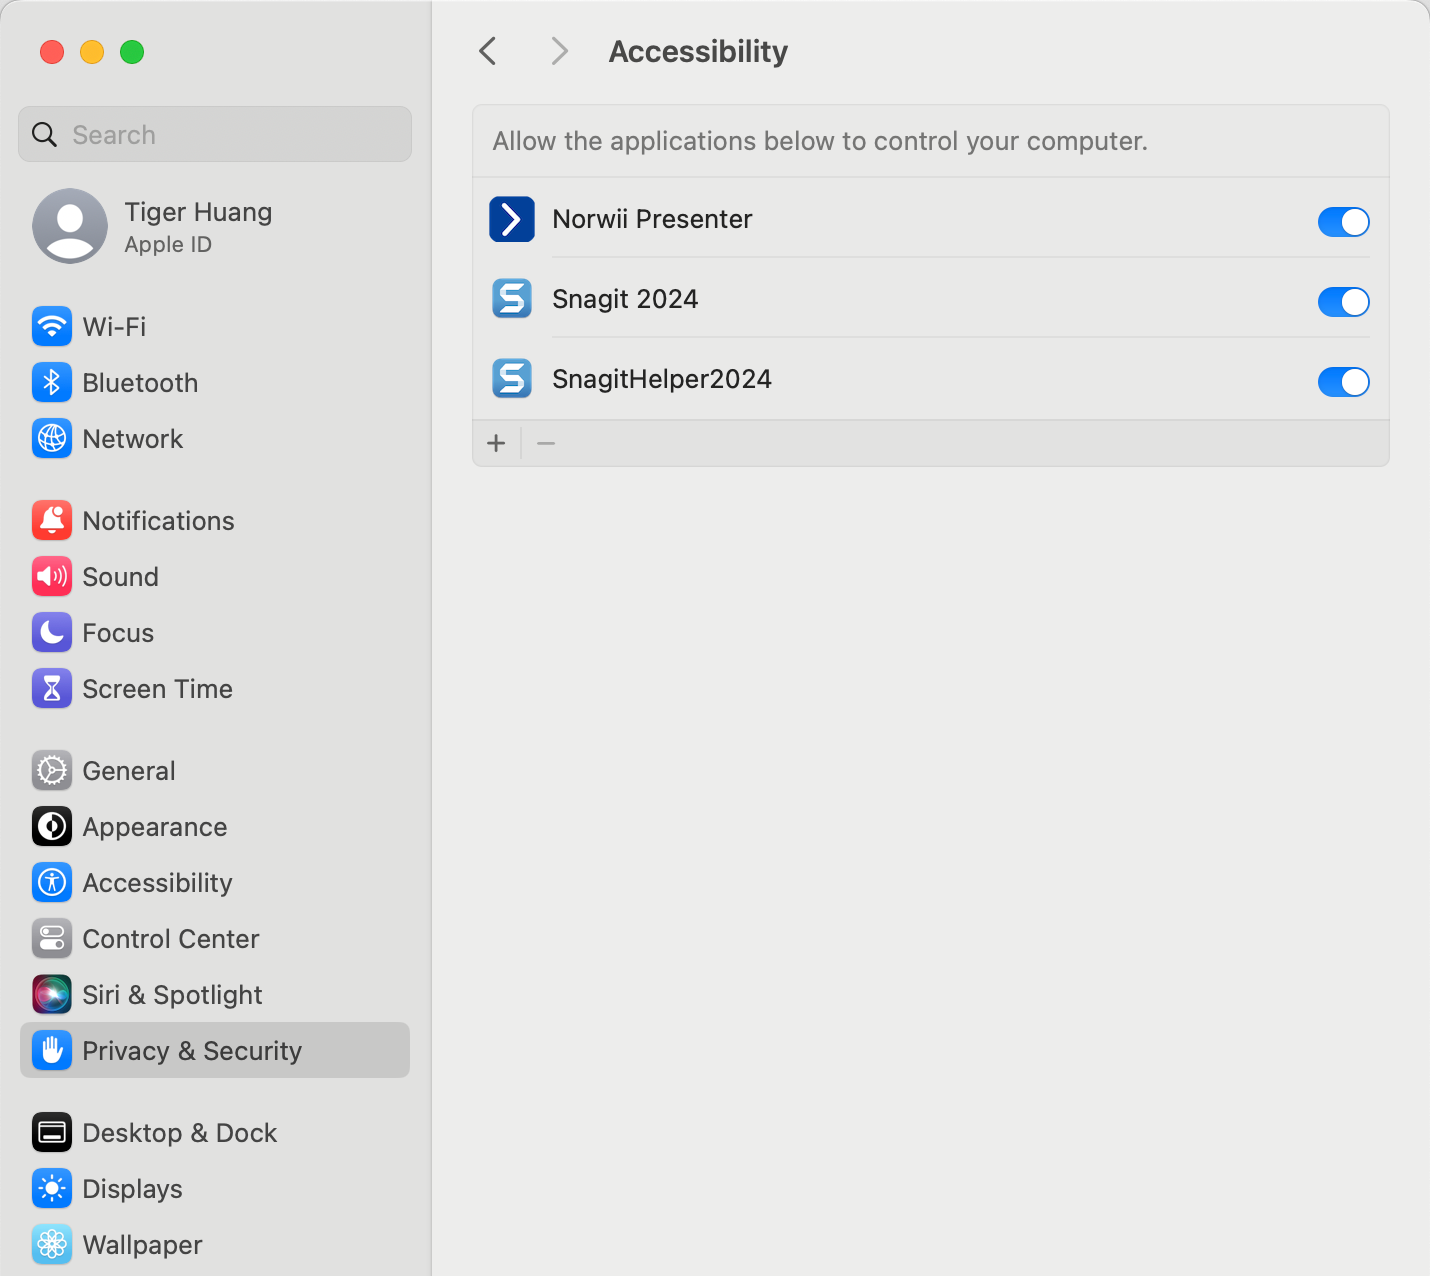
Figure 8
10. After the Norwii Presenter software has the up 3 permissions, open the “About - Grant permission”, and you can see that the Norwii Presenter software has 3 permissions.
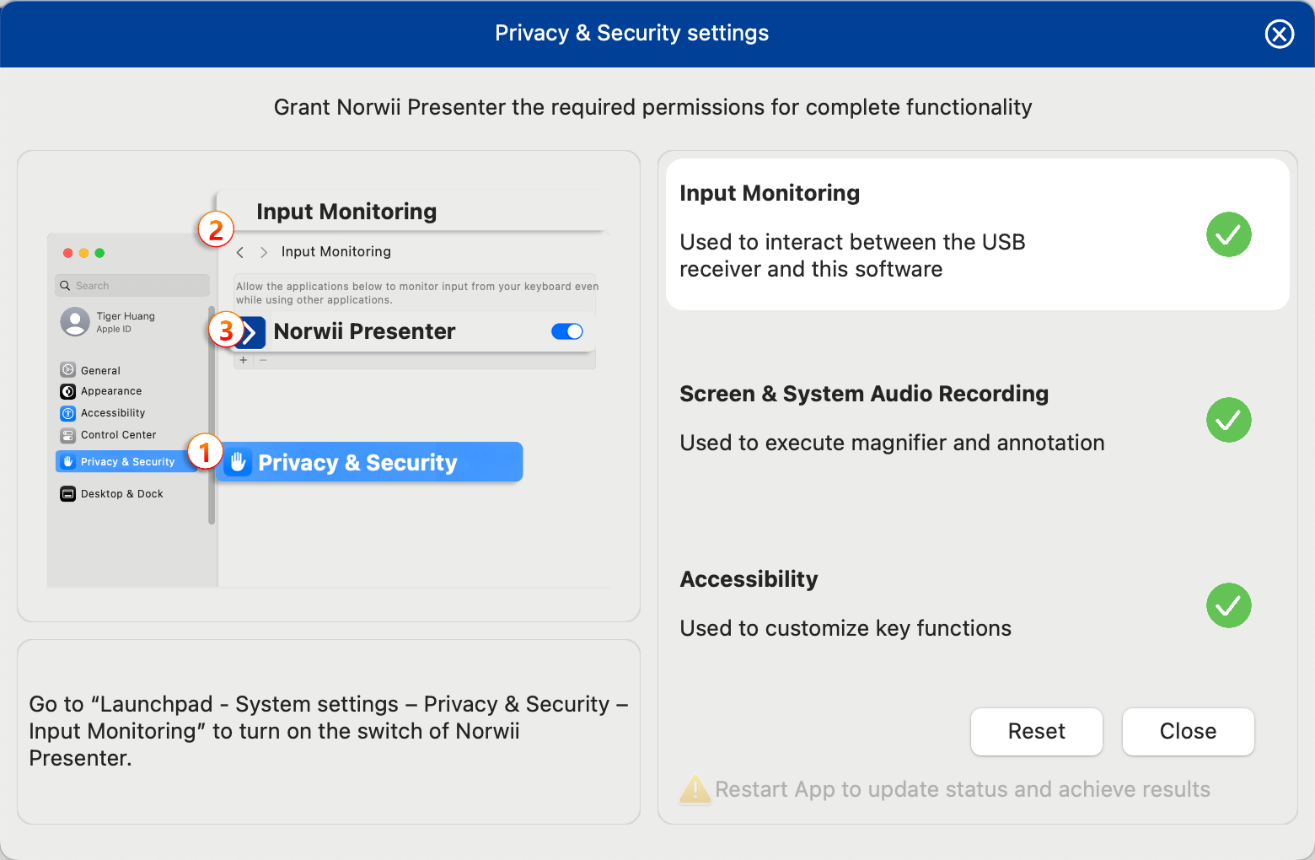
Figure 9
III. Software overview
This Norwii Presenter software is used to work with Norwii wireless presenter. It can provide the wireless presenter with functions such as Digital laser, Highlight, Magnifier, Air mouse, Feature tour, Customize, Pair, Sharing, etc. It can make you have more confidence in controlling the speech, attracting the audience, and successfully reaching the speech effect.
After the software detects the USB receiver, according to the model of the wireless presenter, the Norwii Presenter software will display the function menu for the model, and the default display tabs will also change according to the model.
If the USB receiver is a simple function wireless presenter, the "Pointer" tab will not be displayed; if the USB receiver is a wireless presenter that supports Highlight function, all tabs will be displayed.
On the following figure, the USB receiver is a wireless presenter that supports Highlight function, and all tabs are displayed.
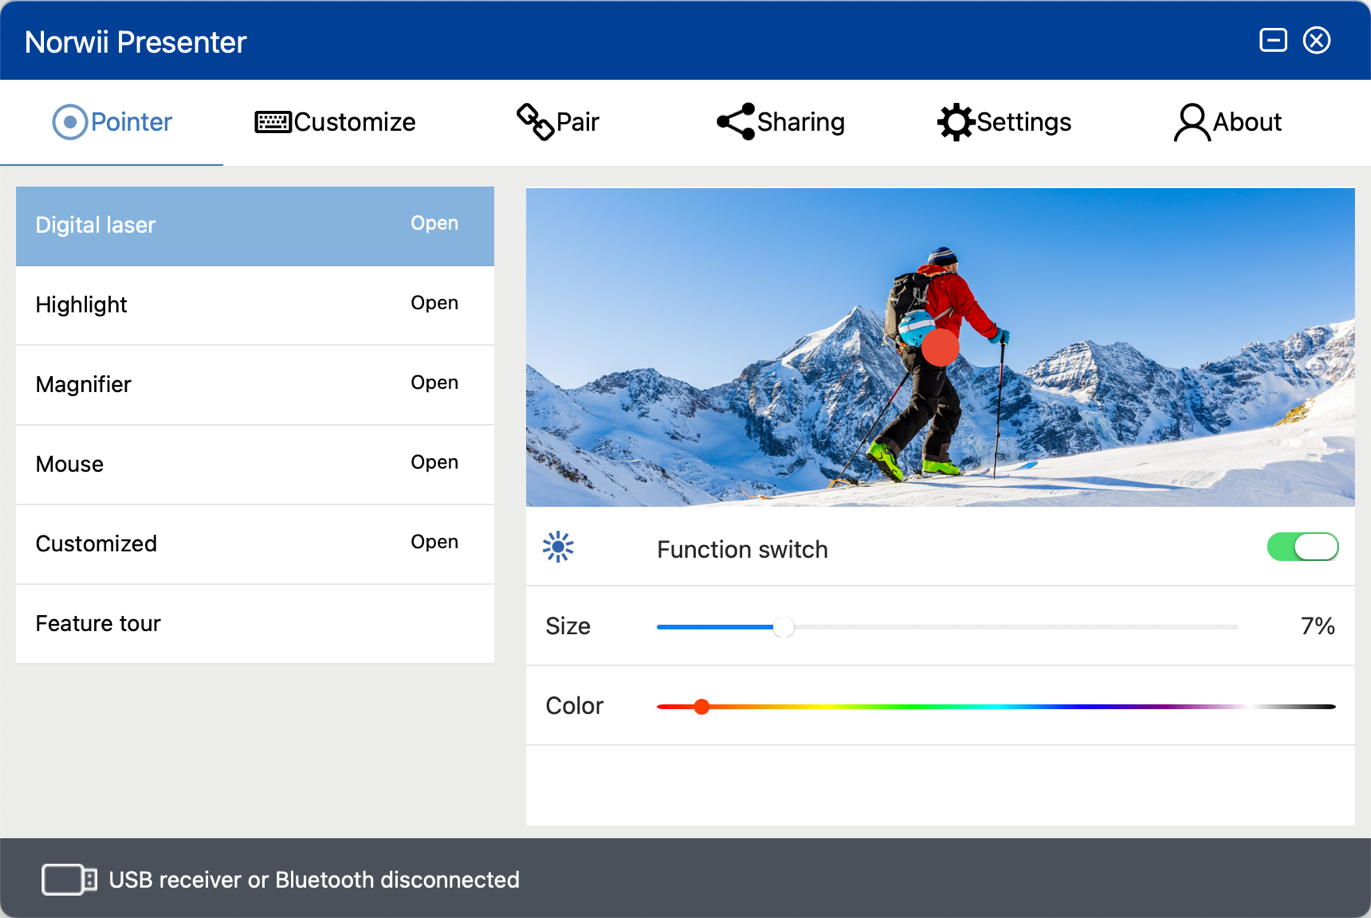
Figure 10
Brief introduction of the function menu:
1. Pointer:Supports the special effects including the digital laser, highlight, magnifier, air mouse, customized icon and feature tour.
2. Customize: You can customize the keys of the wireless presenter to other functions according to your own requirements.
3. Pair:Establish a corresponding relationship between the USB receiver and the wireless presenter. When the USB receiver is lost, you can buy a new USB receiver and pair with the wireless presenter to continue to use the wireless presenter.
4. Sharing:Share a file or URL through the QR code.
5. Settings: You can set the language, software auto start, Pointer settings, Annotate keys, Reminder.
6. About:Including online tutorial, software update, firmware update, contact.
IV. Device status
1. USB receiver or Bluetooth disconnected.
The software does not detect a wireless presenter's USB receiver, and the wireless presenter does not establish a Bluetooth connection with the computer. Please insert the USB receiver into the USB port or try other USB port or let wireless presenter establish a Bluetooth connection with the computer. This software is exclusive to Norwii wireless presenters and cannot detect a USB receiver of wireless presenter of other brands.

Figure 11
2. USB receiver connected, Presenter disconnected.
It indicates that a USB receiver is connected to the computer, but the wireless presenter is not connected with the USB receiver. Turn on the power switch of the wireless presenter and press any key to activate it, the wireless presenter will be connected. If the wireless presenter is still disconnected, check whether the indicator LED is on when you press any key. If not, it means that the wireless presenter has no power. Please charge it and try again.

Figure 12
3. Presenter Connected
It means that the wireless presenter with Highlight function is connected with the USB receiver and the wireless presenter can be used normally. as shown in the figure.

Figure 13
4. The USB receiver is ready!
It means a USB receiver of the simple function wireless presenter has been connected and can be used normally.

Figure 14
5. Found 2 devices are connected, Customize and Pair cannot be used temporarily
The software supports simultaneous use of multiple USB receivers plugged into a computer, but some conflicting functions are temporarily unavailable. The Bluetooth version of the wireless presenter connected to the computer through the computer's Bluetooth is also a device. as shown in the figure.

Figure 15
V. Pointer
The pointer tab provides digital laser, highlight, magnifier, mouse, customized icon and feature tour for the wireless presenter that supports the Highlight function. Long press the pointer key, the corresponding pointer effect will appear on the screen, double-click the pointer key to switch between different pointer effects.
Every pointer effect can be turned on or off. By default, the digital laser, highlight and magnifier are turned on, and the customized icon is turned off. The switch of air mouse depends on mode name of wireless presenters. For example, the mouse function is turned on by default for N95s; The mouse function is turned off by default for the N99Ls, because its has a mouse key.
The user can modify these switches. When the USB receiver is inserted next time, the switch of each mode will change according to the user's settings.
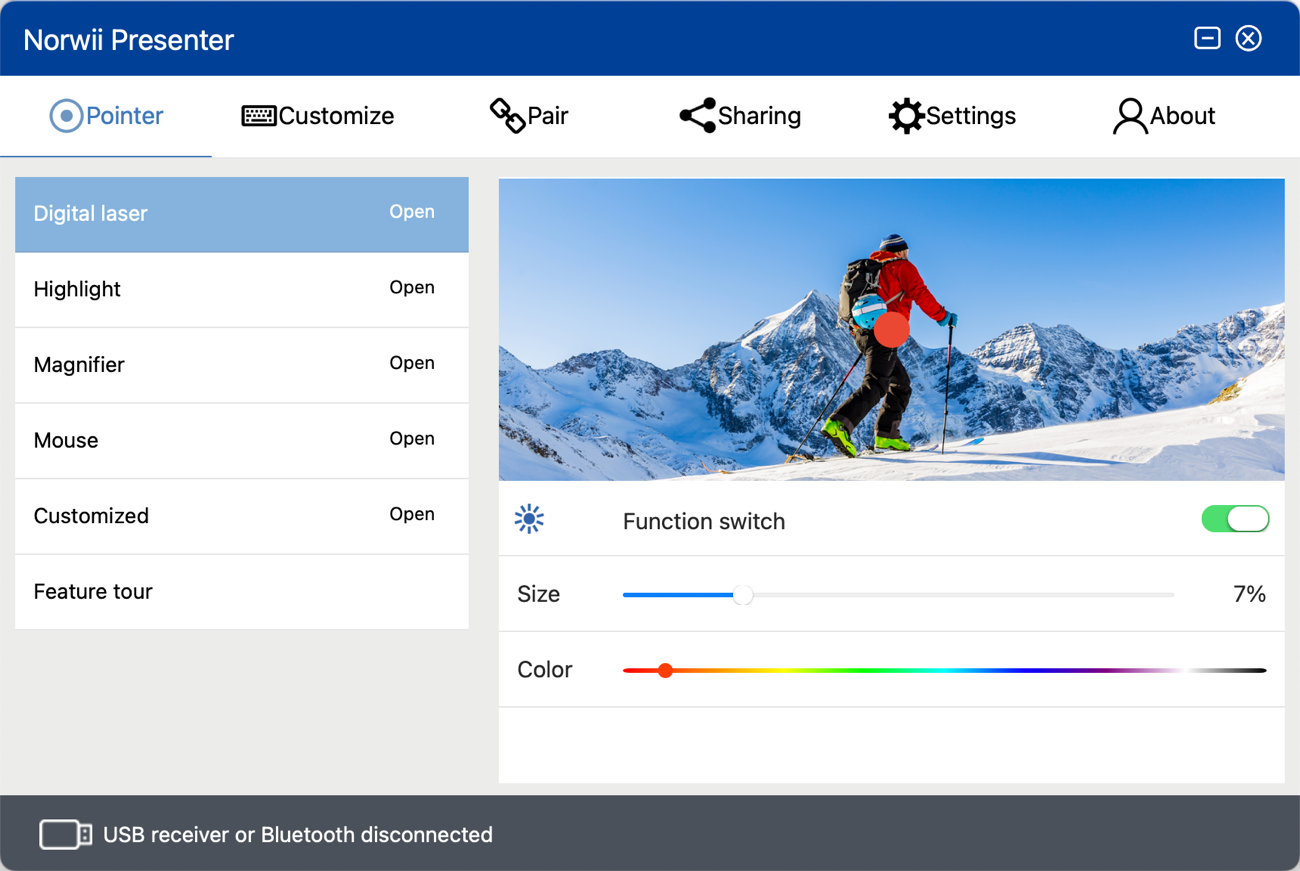
Figure 16
1. How to use the wireless presenter pointer
1) Long press the pointer key to use the digital laser, highlight, magnifier, air mouse, customize icon, etc.
2) Double-click the pointer key to switch between the modes which are on, and the modes that are off will be skipped automatically.
3) Press and hold the pointer key, and then click the page up and down keys to adjust the size of the icon in this mode.
2. Digital laser
The digital laser is to emulate physical laser that displays a solid point on the screen. The digital laser switch interface has 3 functions that can be set. The function switch is used to turn the digital laser mode on and off. The following two options are used to adjust the size and color of the digital laser spot. If you enlarge this point to a certain degree, it will become a circle to avoid covering the screen content, as shown in the figure.
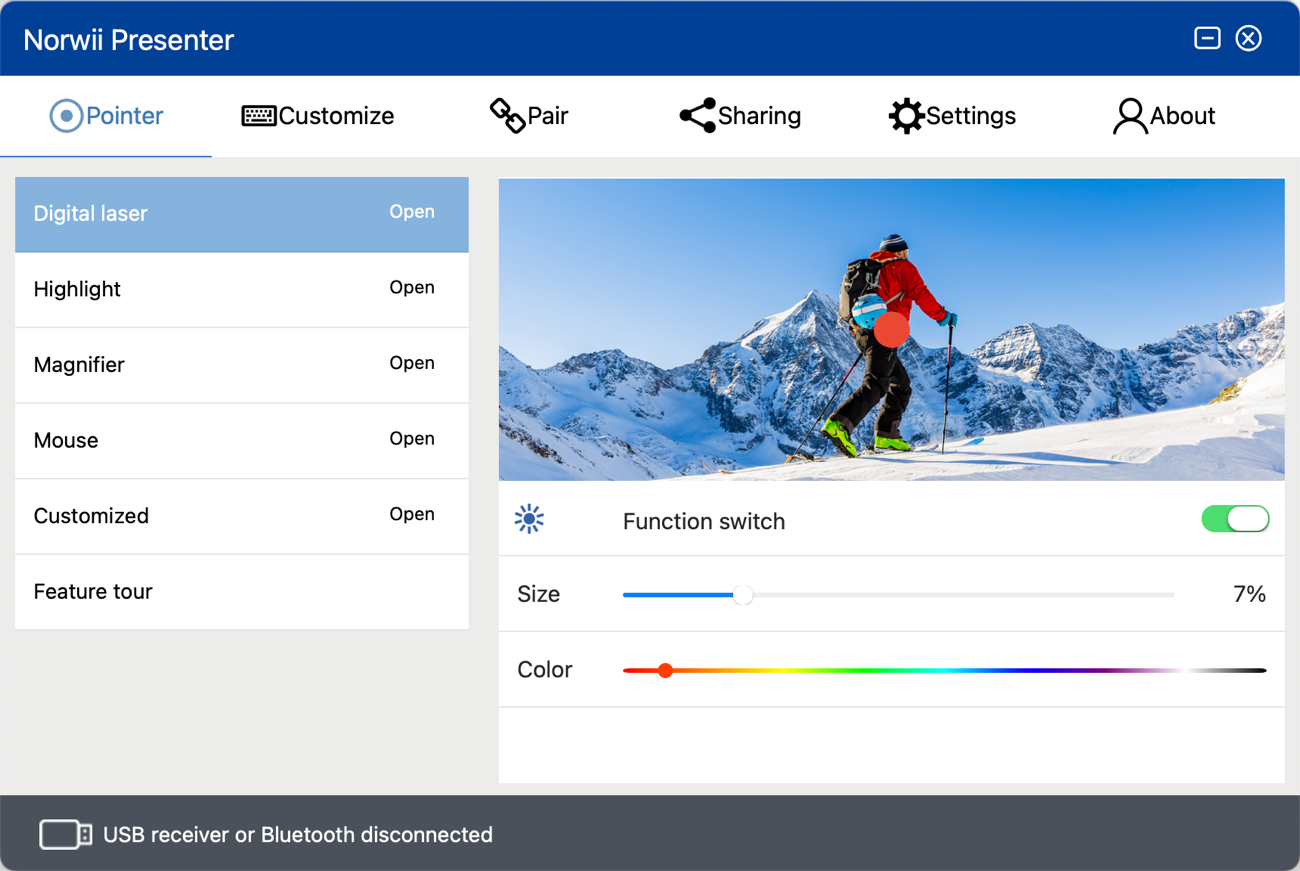
Figure 17
3. Highlight
Use Highlight to dim the background and focus on a part of the screen. The function switch in this interface is used to turn this mode on and off. The following two options can adjust the size of the circle and the contrast inside and outside the circle, as shown in the figure.

Figure 18
4. Magnifier
When using the magnifier function, a magnifying circle will appear, which can zoom in the content to be highlighted, and can set the size, circle color and magnification of the magnifying circle, as shown in the figure.
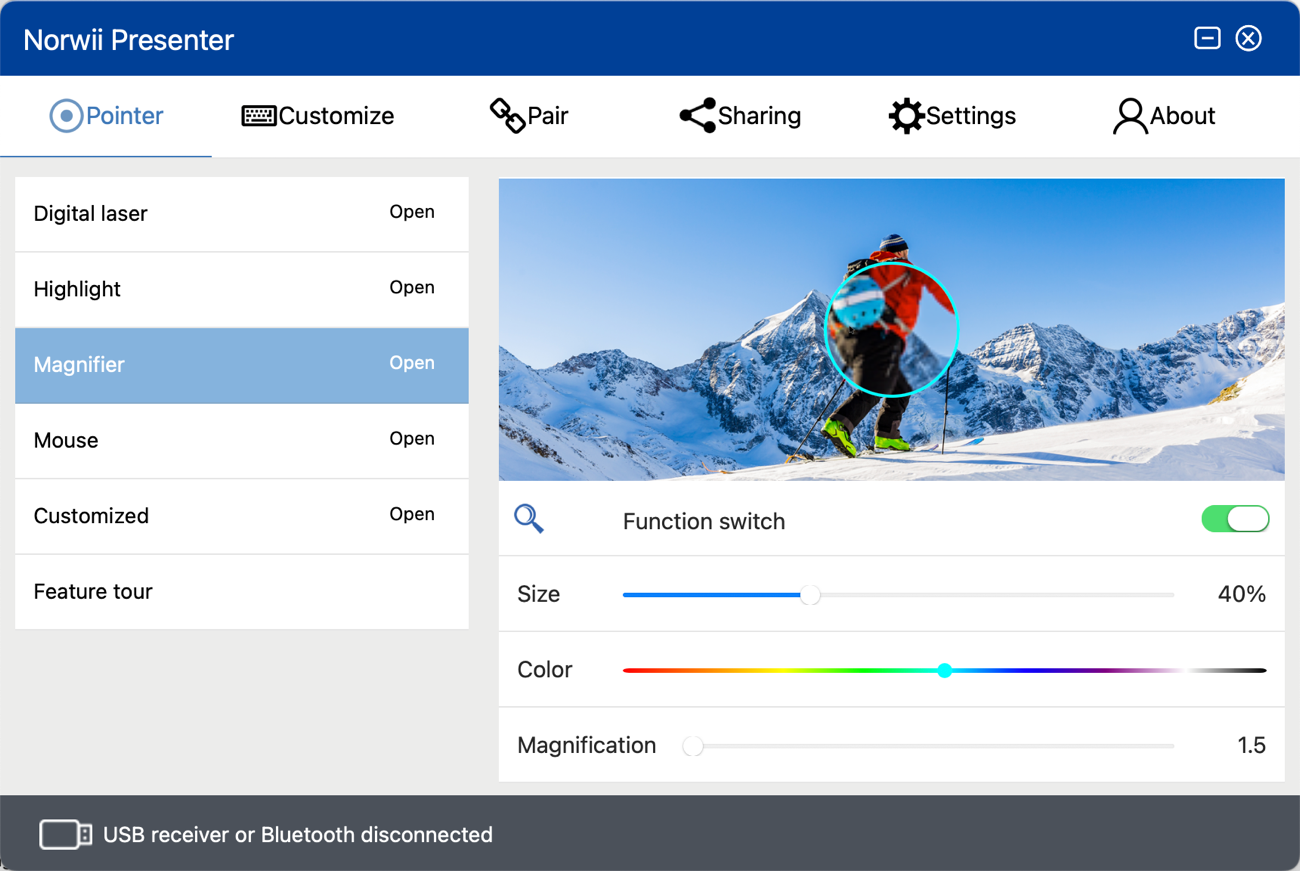
Figure 19
5. Mouse
This tab has only one function switch, which is used to turn on and off the air mouse mode. When the air mouse is turned on, user can double click the pointer key to switch to this mouse mode.
On this mouse mode, the pointer key will function as mouse left button when the pointer key is single-clicked.
In this mouse mode, the new and old versions of the wireless presenter move the mouse in different ways.
For wireless presenters before mid-2024, when you move the wireless presenter in the air, the mouse pointer will move according to the gesture. During the moving, there is no need to long press the pointer key. In this mode, the pointer key is the left mouse button function when single-clicked, double-clicked to switch the pointer mode, and long press to achieve the left mouse button long press function.
For wireless presenters after mid-2024, you need to long press the pointer key and move the wireless presenter in the air, and the mouse pointer will move according to the gesture. When you release the pointer key and move the wireless presenter in the air, the mouse will not move. The purpose of this changing is to accurately position the mouse on the application button to be clicked, so that the mouse will not move away from the button during clicking the pointer key. In this mode, the pointer key only has the left mouse button single-click function, no left mouse button long press function, cannot be dragged and dropped, and has no left mouse button double-click function. User can use this mode to move the mouse and single click to open the hyperlink on the slides. Double click is used to switch modes and cannot be used to open a file. It doesn’t support click and drag function like a usual mouse left button.
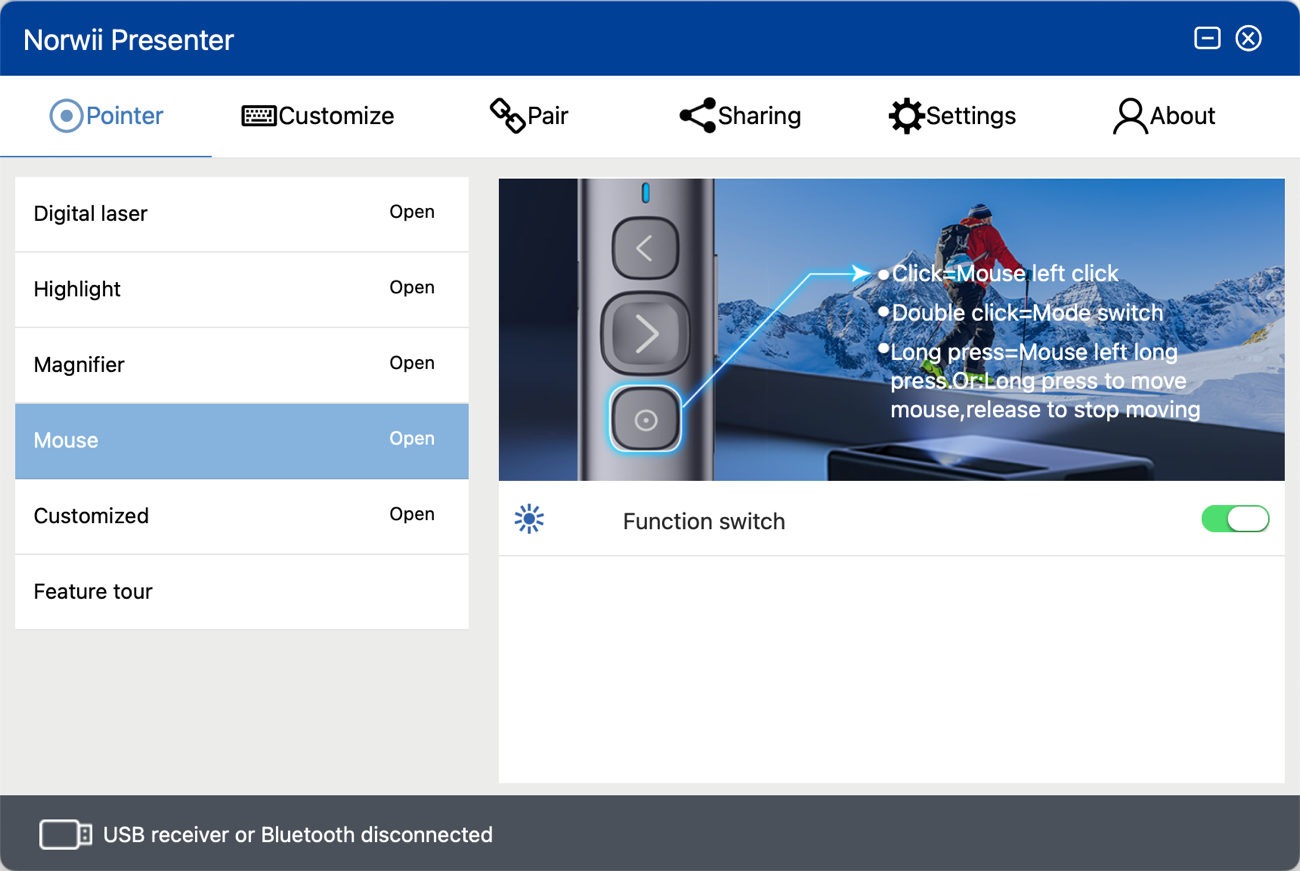
Figure 20
6. Customized
The customized mode allows the user to display a user defined picture as an indicator icon on the screen. Open the customized function switch, you can import a picture. The software supports four picture formats: png, bmp, jpg, gif, and can set the size of the picture; In the customized mode, long press the pointer key, the user customized picture will be displayed, press and hold the pointer key and then press the page up and down keys to adjust the size of the picture, as shown in figures. If the user wants to make a customized icon, it is recommended that the image format use PNG, and the part of the image without the image is set to transparent.
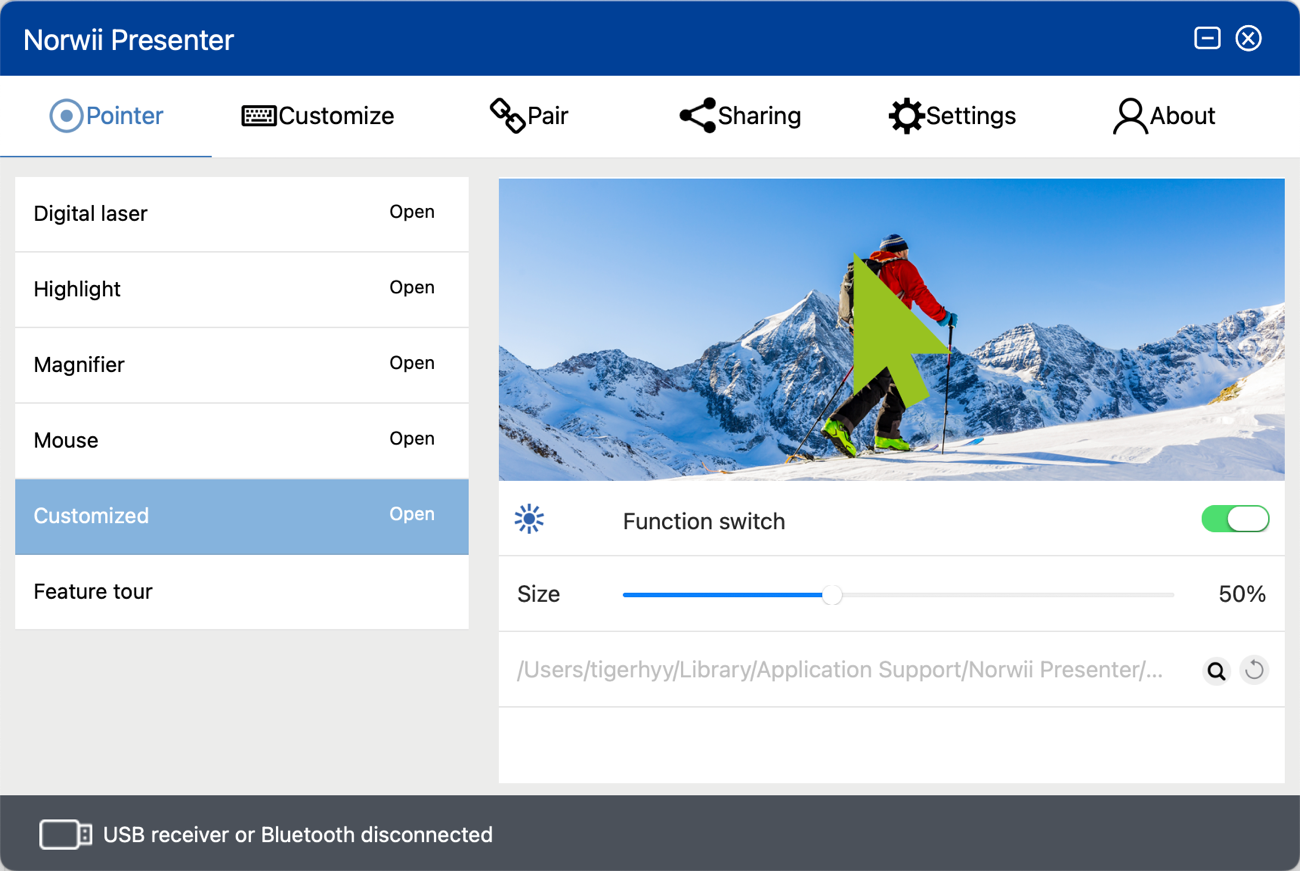
Figure 21
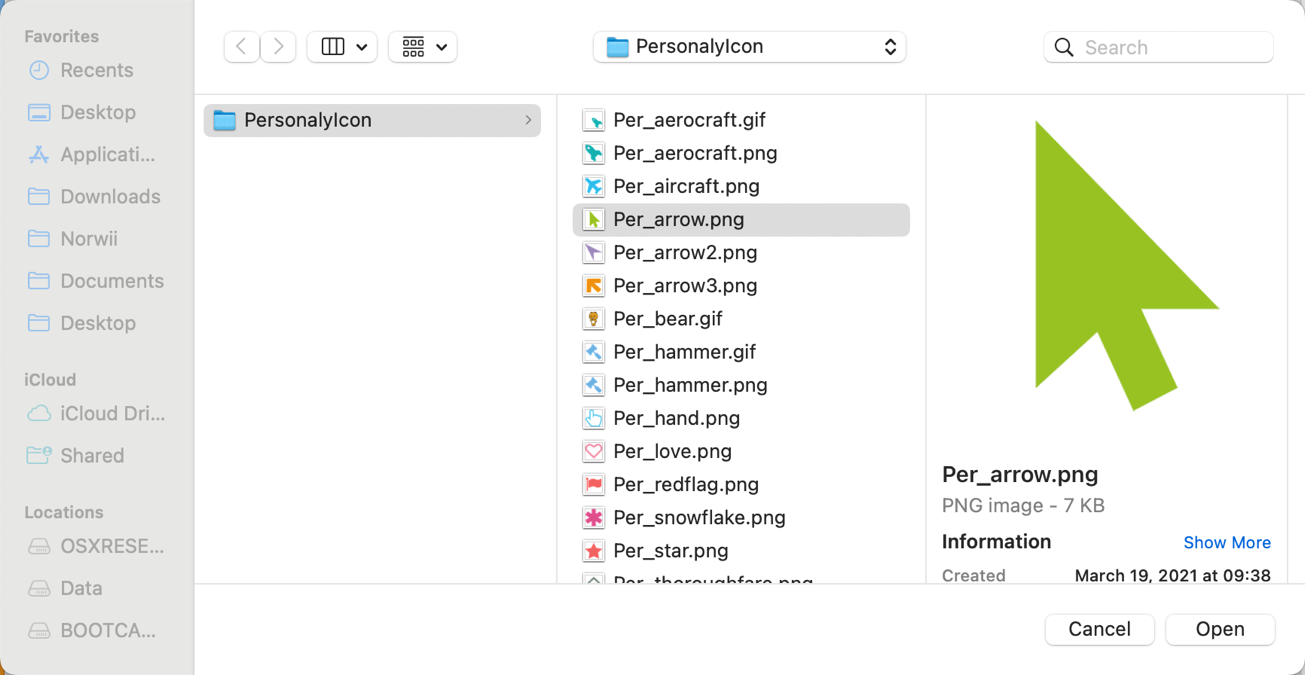
Figure 22
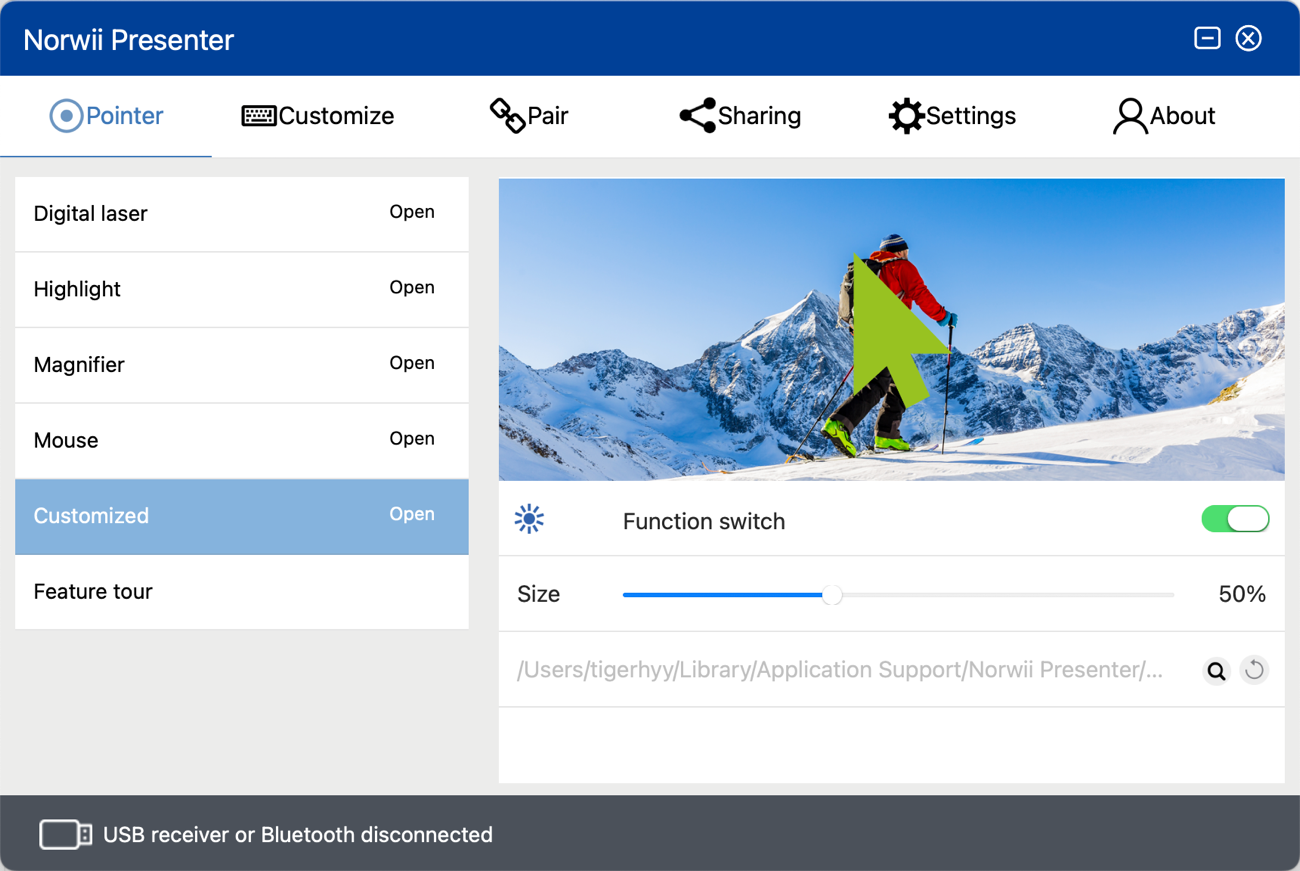
Figure 23
7. Feature tour
When installing the software for the first time, the feature tour will automatically pop up for the Highlight wireless presenter. This function will guide users to operate the keys of the wireless presenter step by step and demonstrate the functions of the wireless presenter, as shown in the figure.
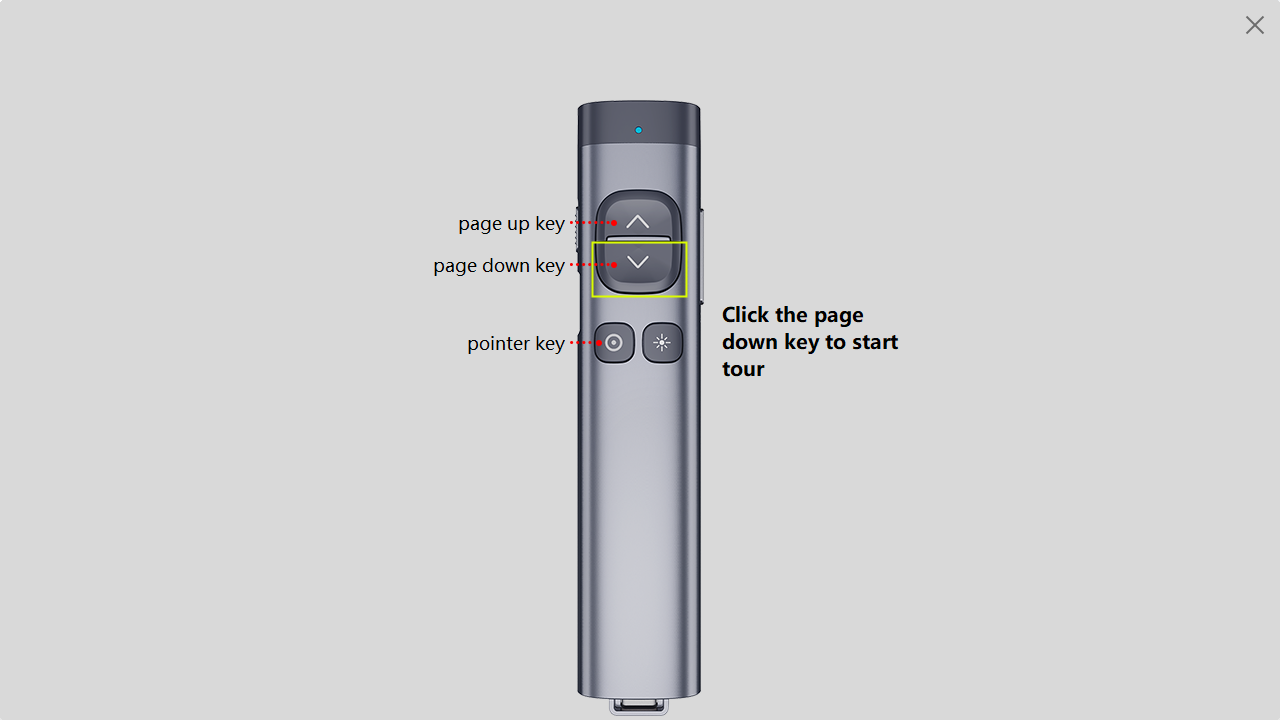
Figure 24
VI. Customize
The short press and long press functions of each key of wireless presenter correspond to the key values on the computer keyboard. The key customization is to customize the short press and long press functions of the wireless presenter to the key values of other keys on the keyboard, as shown in the figure. Only the keys with blue text can be customized.
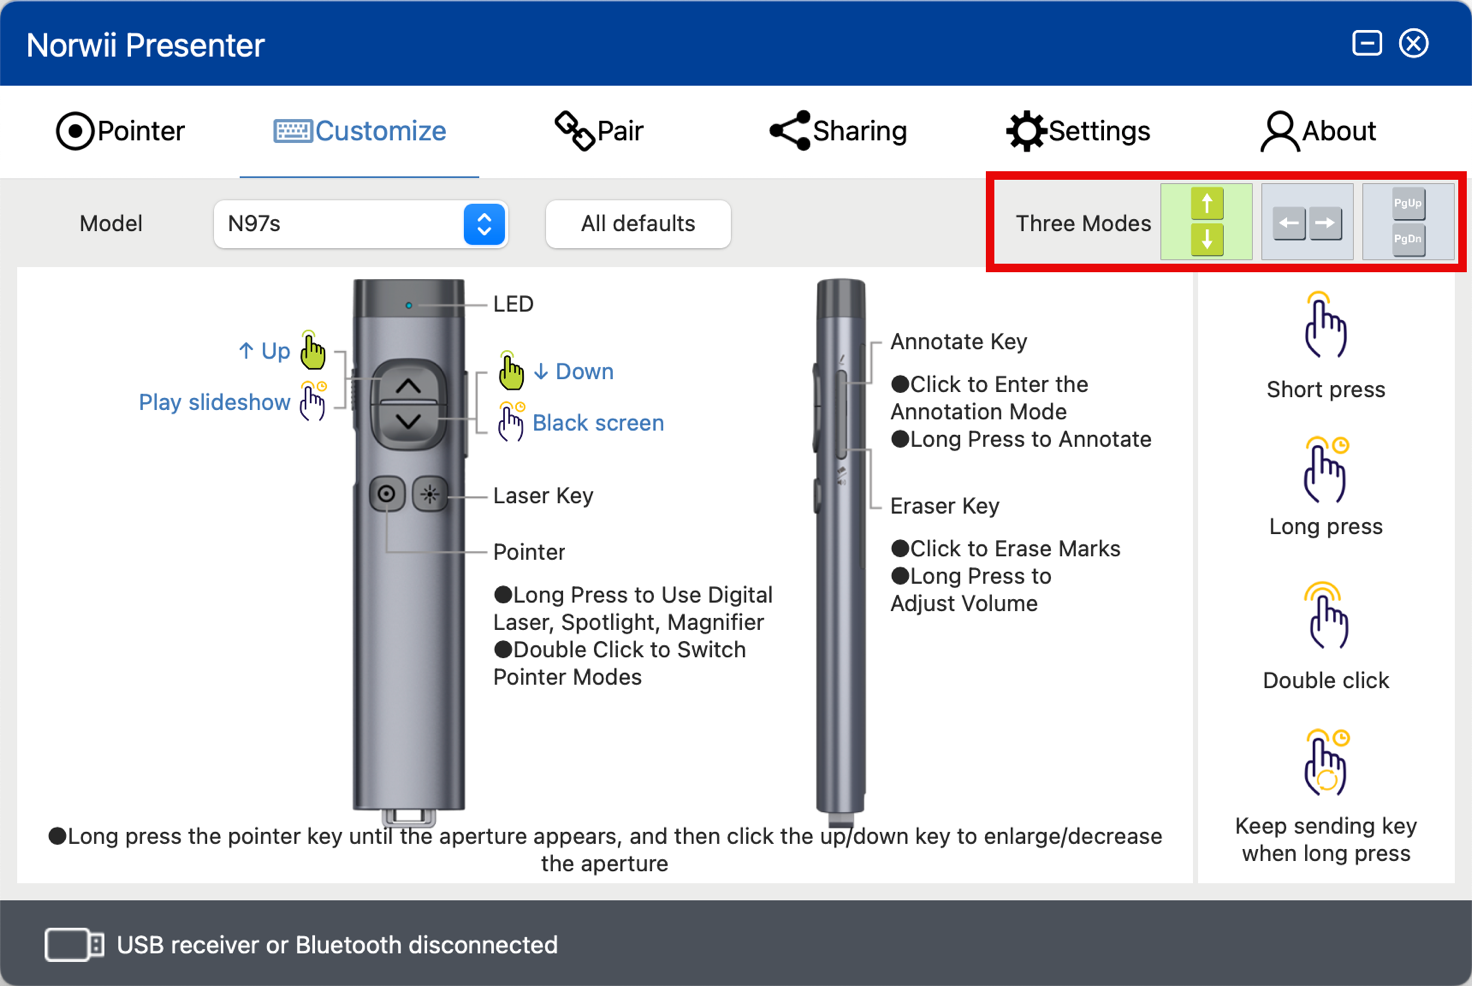
Figure 25
1. Model
When the wireless presenter is made in the factory, the wireless presenter model is stored into the USB receiver. For Bluetooth wireless presenter, the wireless presenter model is stored into the USB receiver and the wireless presenter. The Norwii Presenter software can automatically read and display model in the wireless presenter model box. Users generally do not need to manually change the model of the wireless presenter, otherwise it will cause some functions not work properly.
The USB receiver purchased separately by the user does not save any wireless presenter model. When the software detects this kind of USB receiver which has no model, a dialog box will pop up to let the user choose the wireless presenter model. The user only needs to select the model’s name that matches the model printed on the wireless presenter, as shown in the figure.

Figure 26
In the dialog box that pops up, if the USB receiver supports simple functions, only the simple function models are displayed. If the USB receiver supports the Highlight function, only Highlight models are displayed.
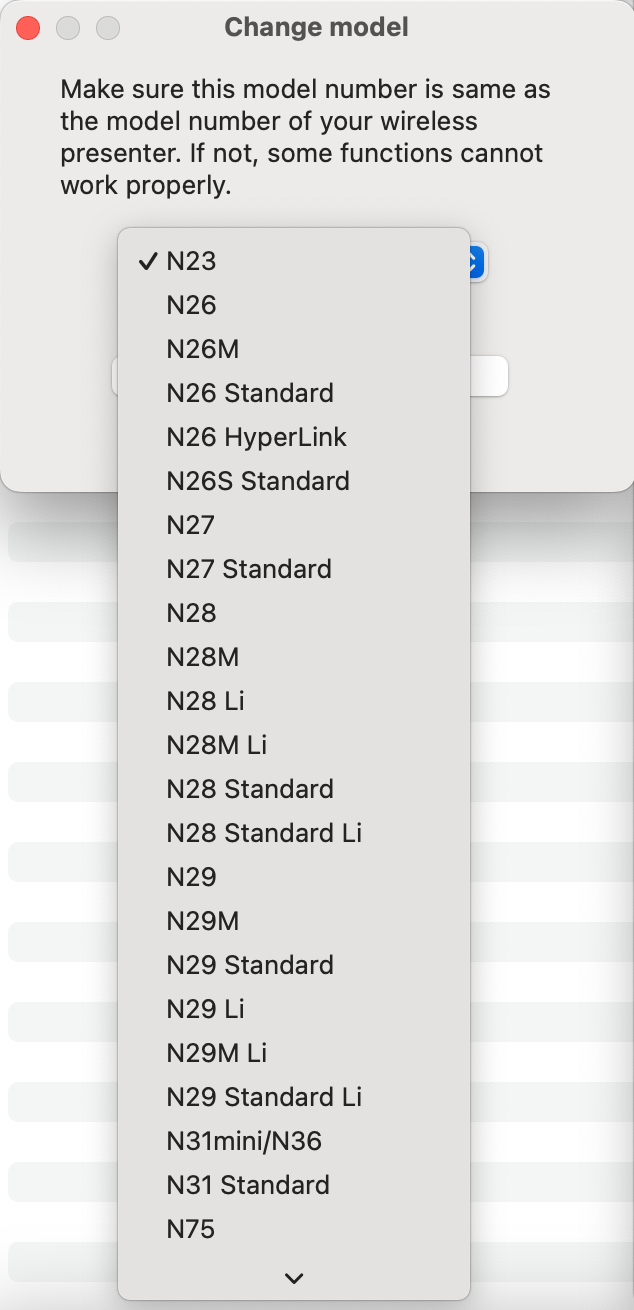
Figure 27
2. Keys of presenter
The keys of the wireless presenter are the objects for users to customize their functions. Only the keys with blue text can be customized.
For wireless presenters that support simple functions, the keys that can be customized include page up, page down, volume up, volume down, Tab, Enter, etc. For wireless presenters that support Highlight functions, the keys that can be customized only include the page up and page down keys.
3. Three modes of Page down and Page up key
When doing customization, it is necessary to note that there are three modes of the Page down and Page up keys of the wireless presenter, which is set for different software. The functions of Page down and Page up key can be switched by holding down the Page down and Page up key at the same time. When you click the Page down or Page up key, the key value sent to the computer can be the up and down arrow on the keyboard, or the left and right arrow on the keyboard, or the Page down and Page up key on the keyboard.
When the key function is customized, the definition is only for one of these three modes.
Short press of Page down and Page up key has three modes, long press function has only one mode.

Figure 28
4. Short Press Function and Default
Click the blue text of short press function of one key in the figure, and the user can press the key or combination key on the keyboard to set it as the key value of the short press function.
Except for some key combinations used by macOS, such as Command-V and Control-Command-Q which cannot be set to the customizable key, most key combinations can be customized to short press.
Special keys such as playback control and volume control can be directly selected by clicking the special button.
If the user wants to restore the default setting, click the Default button to restore the default value. Whether you set it yourself, click the special key to set it, or restore the default, click the Save button to save it, otherwise the setting will not save and take effect. as shown in the figure.
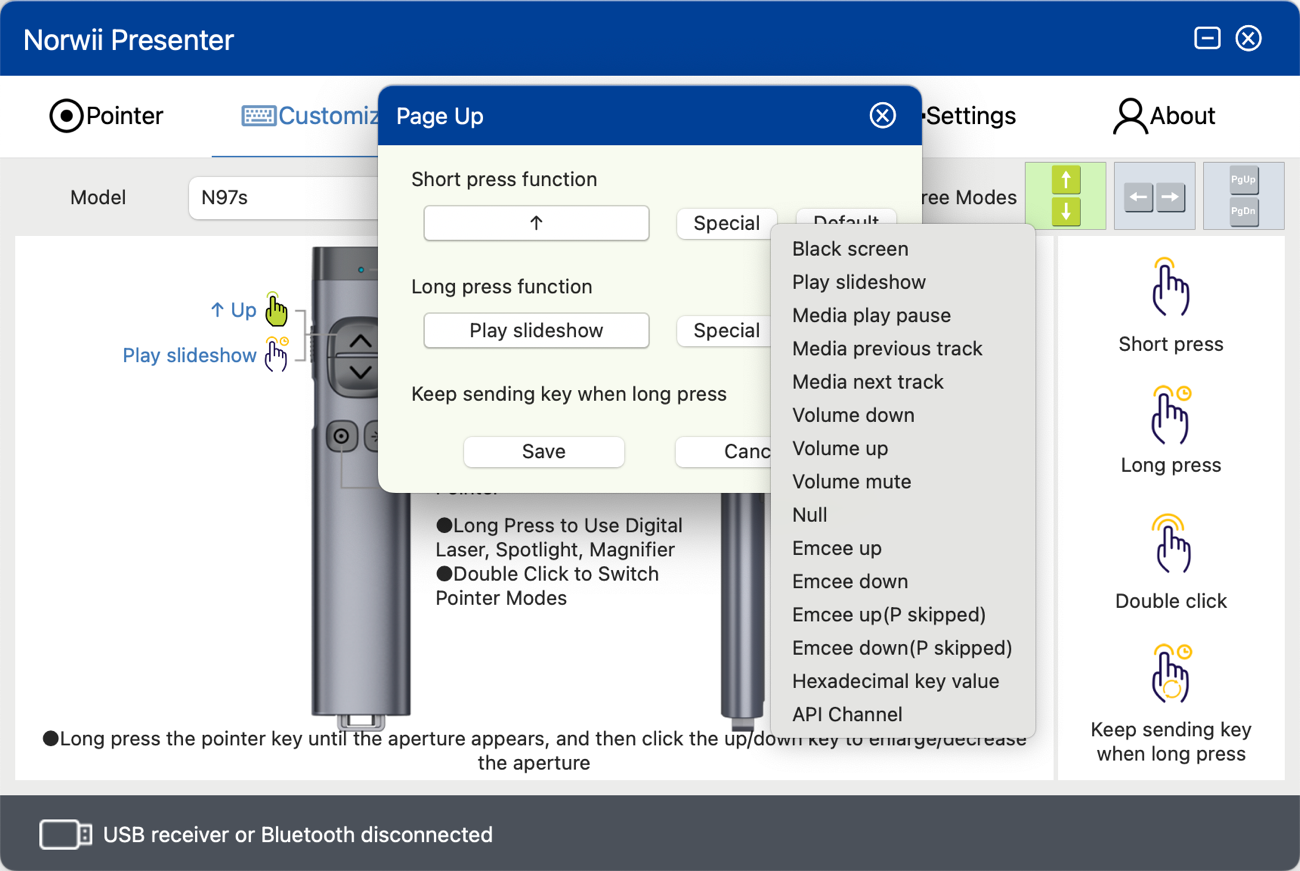
Figure 29
Emcee up and Emcee down stand for wireless presenter sends letters to the computer in order of their layout on the keyboard. Farrago for macOS uses this method to control music.
Emcee up (without P) and Emcee down (without P) are sent letter sequences that do not contain P, which is used by Sports Sounds Pro for Windows, where P is the pause key.
The key sequence that Emcee up and Emcee down will send to computer is as following:
1,2,3,...9,0
Q,W,E,...I,O,P
A,S,D,...K,L
Z,X,C,...N,M
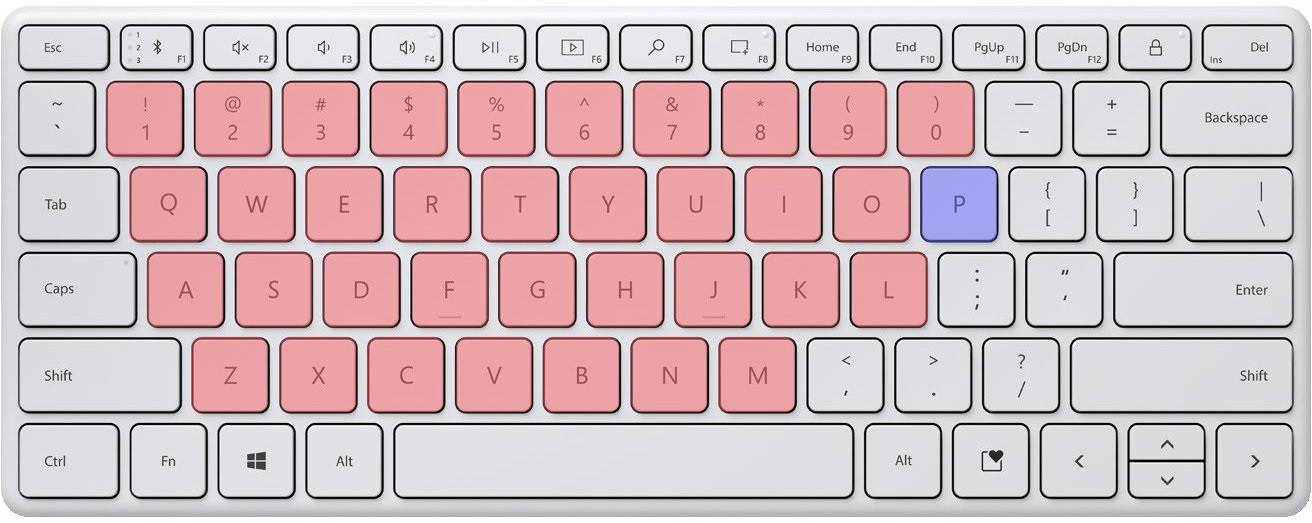
Figure 30
Some keys or key combinations cannot be entered by pressing keys on the keyboard or selected by Special button. In this case, you can select "Hexadecimal key value" from the pop-up menu of the Special button and enter a hexadecimal key value.
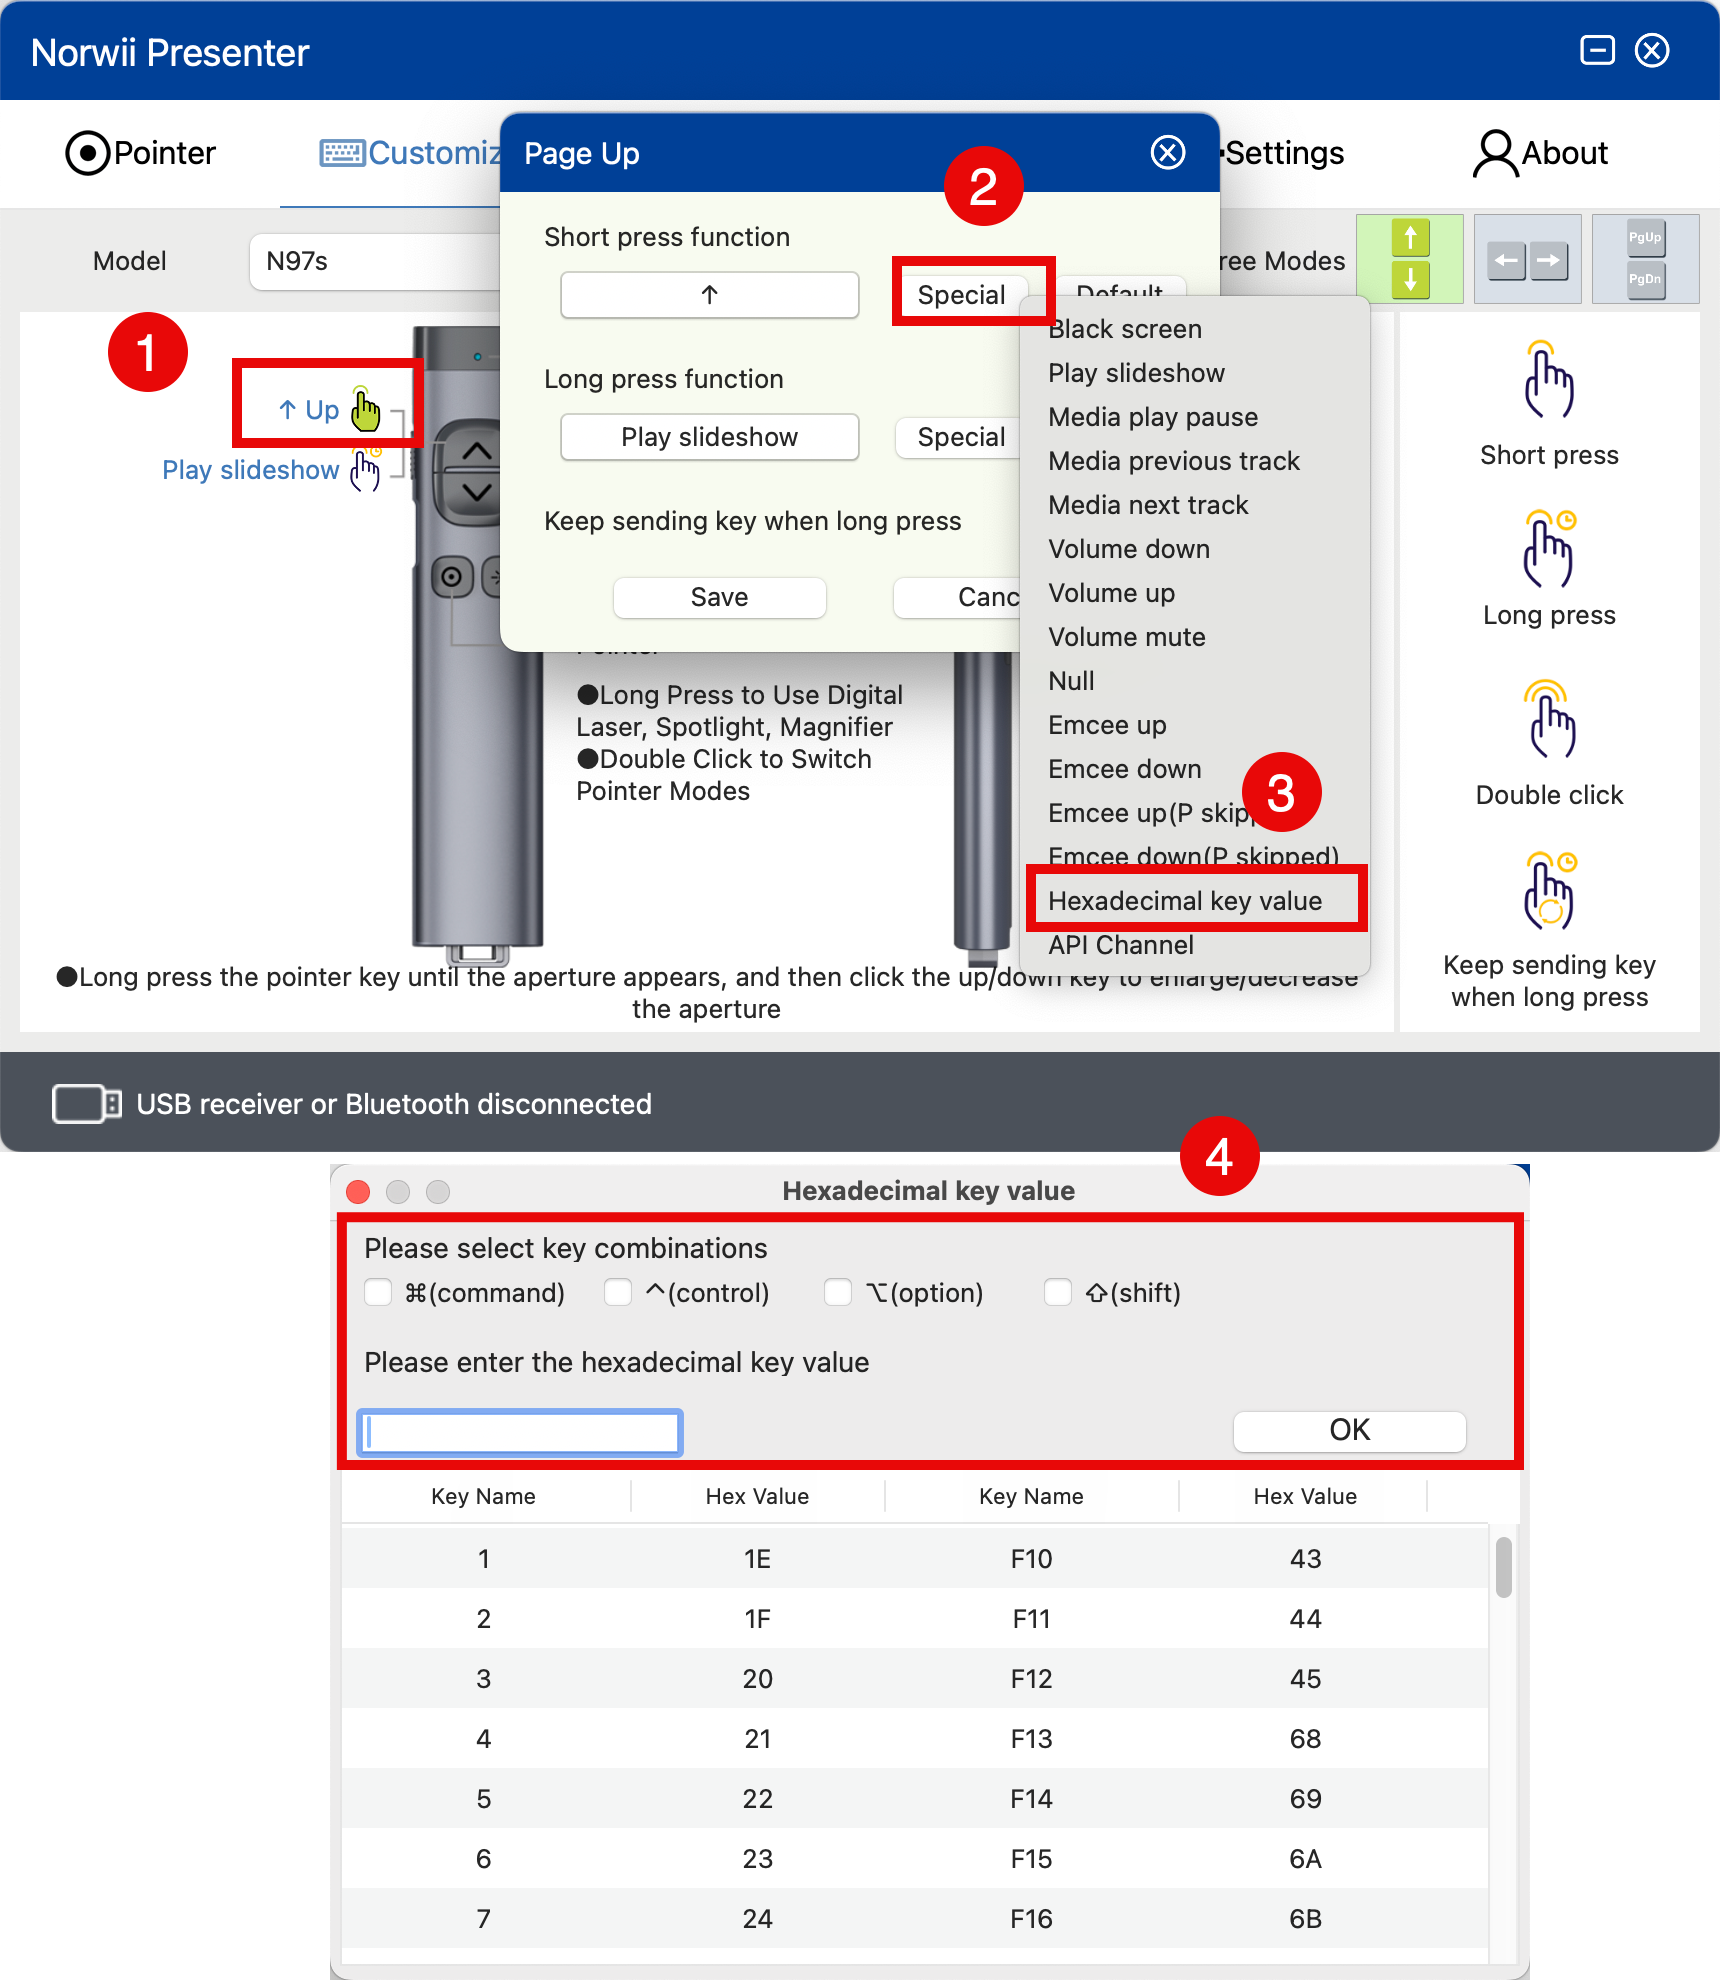
Figure 31
5. Long Press Function and Default
The setting of the long press function is basically as same as the short press. “Keep sending key when long press" is a switch, as shown in the figure.
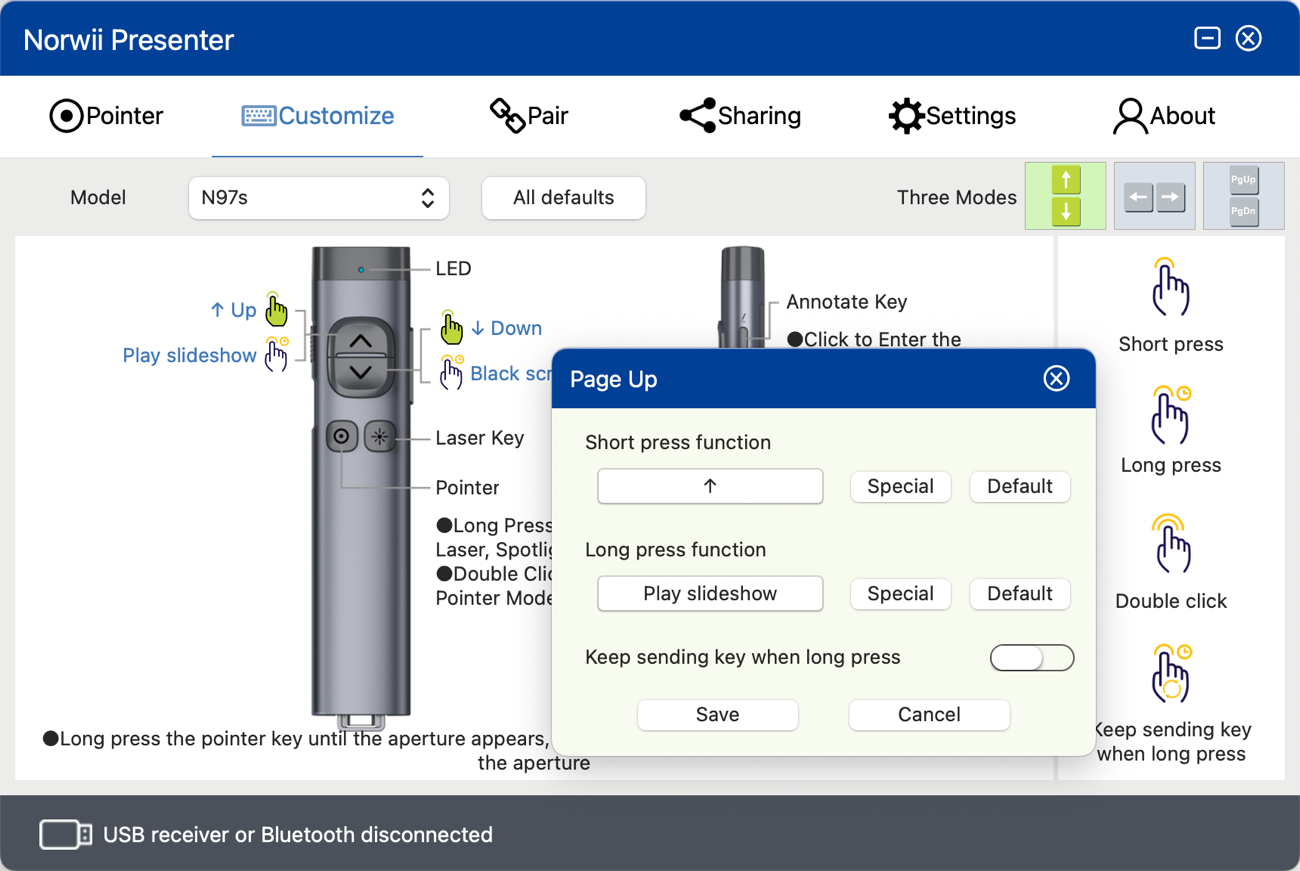
Figure 32
When the switch is turned on, if the key is pressed for a long time without releasing, the wireless presenter will continuously send the key value to the computer. This is useful for special keys such as volume control. If you set the page up key to increase the volume, and long press the page up key without releasing it, you certainly want the volume to keep increasing to the maximum, rather than to increase only once.
When the switch is off, the wireless presenter only sends the key value to the computer once when the key is pressed for a long time without releasing it. If you set the long press of a key to B, and turn off this switch, when PowerPoint is playing in full screen, you press and hold the key, the USB receiver will send B to the computer, PowerPoint will enter a black screen. Of course, this key value had better send only once.
6. Save & All Defaults
All defaults button means reset all key values to default settings.
If the wireless presenter is connected to the computer through Bluetooth, it may take a long time to restore "All defaults", please wait patiently.
All your customizations take effect only after the Save button is clicked. However, when you click "All Default" button, you do not need to save it, and it will take effect immediately.
VII. Pair Operation
Pair operation is used to establish a relationship between the USB receiver and the wireless presenter. Each wireless presenter is assigned a unique code at the factory, and the USB receiver exclusively responds to the wireless signal of the wireless presenter with its stored unique code. The Pair operation means to save the unique code of the wireless presenter into the USB receiver. If the user loses the USB receiver, they can buy a new USB receiver, and after Pairing, they can continue to use the wireless presenter.
1. Pair:
First click the Pair button of the Norwii Presenter software, keep the distance between the wireless presenter and the USB receiver within 20cm, then turn off the power switch of the wireless presenter and turn it back on. Finally, press the page up and down keys of the wireless presenter and check whether there is key data displayed in the data box on the lower right. Note that you must strictly follow the above sequence. The keys you press are also the page up and down keys, not other keys. If the power of the wireless presenter is on before clicking the Pair button on the software, you must turn it off and turn it on again, and then press the page up and down keys of the wireless presenter.
Some models of wireless presenter automatically emit Pair signals when they are turned on, while others only emit Pair signals when the page up and down keys of the wireless presenter are pressed after powering on. Simply to remember, you should click the Pair button first, then turn off and turn on the power switch of the wireless presenter, and finally press the page up and down keys of the wireless presenter.
Another point to pay special attention to is that when Pairing, the distance between the wireless presenter and the USB receiver should be kept within 20cm. If the distance between the two is too far, the Pair will fail. Paired successfully as shown in the following Figure.
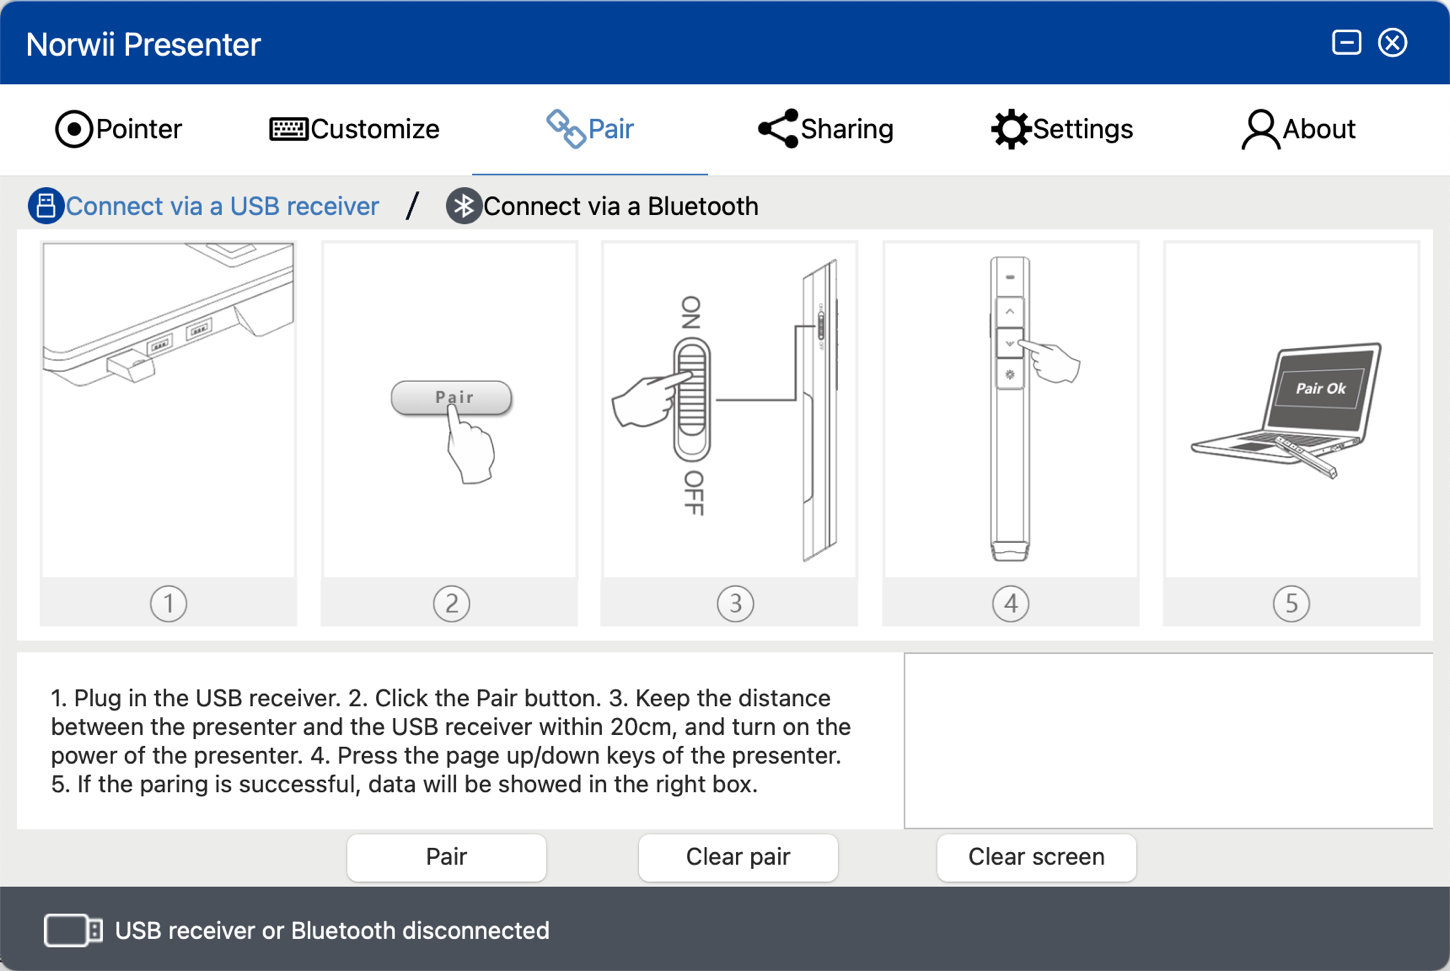
Figure 33
2. Clear pair:
The Clear pair operation is to clear the unique codes of one or more wireless presenters currently saved in the USB receiver. Each wireless presenter has a unique code when it is made in the factory. The Pair operation is to let the USB receiver save the unique code of the wireless presenter. The USB receiver only responds to the wireless signal of the wireless presenter that has saved its unique code in the USB receiver.
For simple function wireless presenter, the USB receiver can save up to 6 unique codes of the wireless presenters. As long as 6 Pair operations are performed, the USB receiver can save the unique codes of 6 wireless presenters and thus be controlled by these 6 wireless presenters at the same time.
The Clear pair is to clear the unique codes of one or more wireless presenters currently saved in the USB receiver at once. After Clear pair, there is no unique code of any wireless presenters saved in the USB receiver, and it is no longer controlled by any wireless presenters.
For Highlight wireless presenters, due to both-way wireless communication, the USB receiver will only save one unique code for the wireless presenter. Each Pair operation will overwrite the previous unique code, and there is no need to perform a Clear operation.
After you clear the code, the USB receiver will not save any unique code. The next time the USB receiver is plugged into the USB port of the computer, the USB receiver will automatically enter the waiting Pair state. At this time, there is no need to open the Norwii Presenter software to click Pair button. Just turn off then turn on the power switch of the wireless presenter and then press the page up and down keys, you can Pair the wireless presenter.
3. Clear screen: Clear the content of the lower right data box.
4. Wireless presenter connects to macOS computer via Bluetooth.
Only the Bluetooth Norwii wireless presenter has Bluetooth. Wireless presenter with Bluetooth usually comes with a USB receiver, which can be used on some desktop computers without Bluetooth. For wireless presenters with Bluetooth, when the USB receiver is inserted into the computer USB port, the wireless presenter will first establish a connection with the USB receiver. It means the USB receiver has priority than computer’s Bluetooth.
The wireless presenter can only have one connection with computer, USB receiver or computer Bluetooth. It is unable to establish a connection with the computer's Bluetooth after it has established a connection via the USB receiver. Only when the USB receiver is unplugged and the wireless presenter is not connected to the USB receiver, the connection can be made via computer Bluetooth. Click "Connect via computer Bluetooth" in the Pair tab of Norwii Presenter, you will see the process. The specific operation is shown in the following figure.
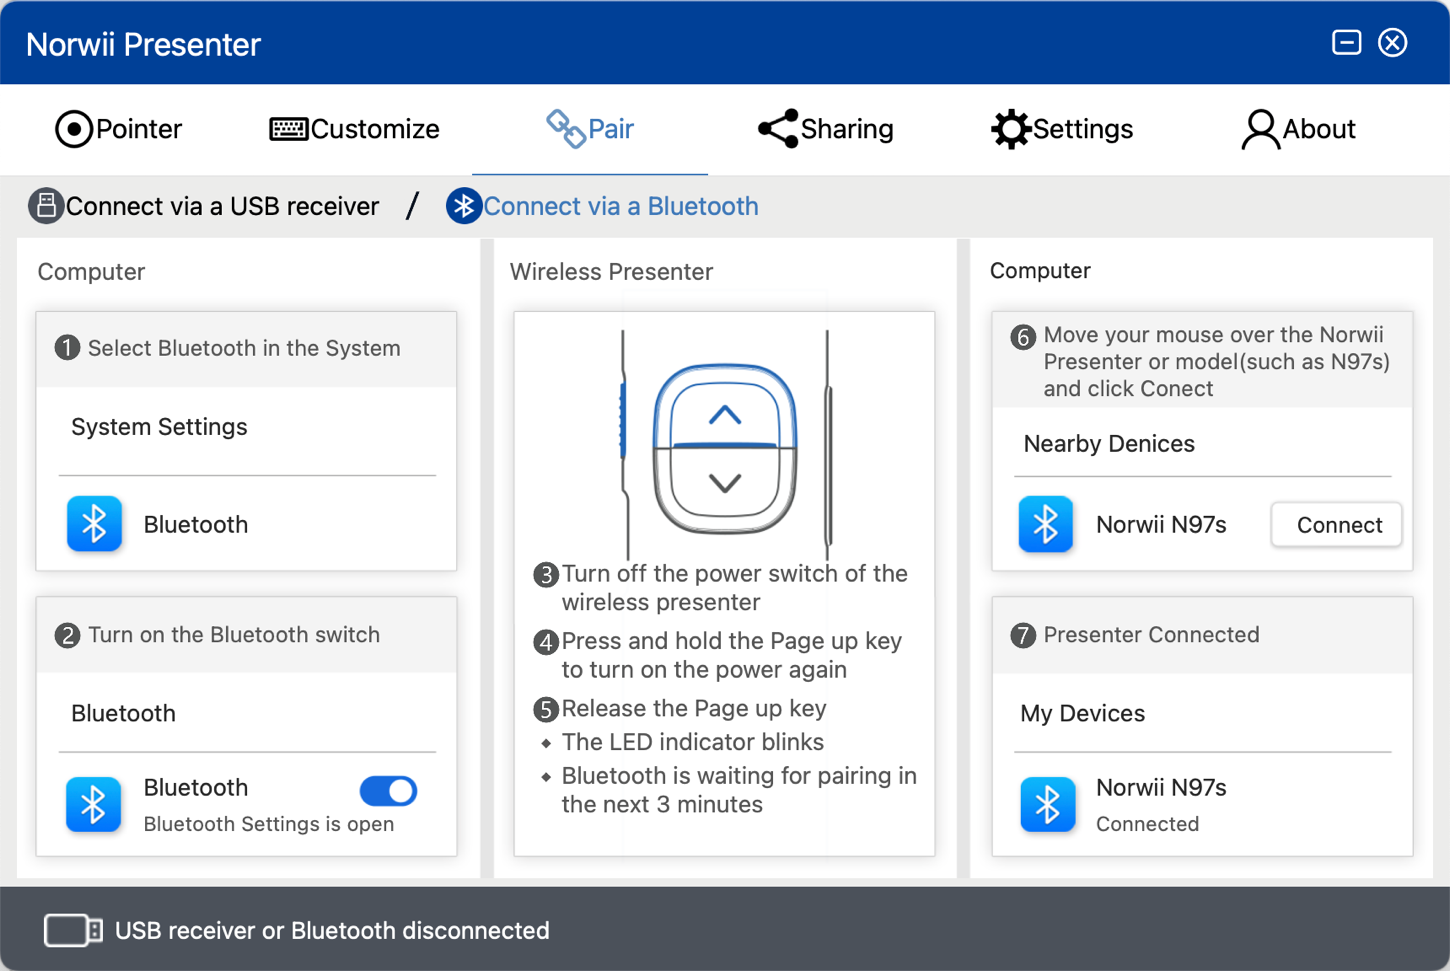
Figure 34

Figure 35
1) Turn off the power of the wireless presenter, press and hold the wireless presenter's page up key, turn on the wireless presenter's power switch, and then release the wireless presenter's page up key. At this time, the wireless presenter's LED will flash, indicating that Bluetooth is waiting for pairing.
2) Turn on the Bluetooth switch of macOS. You need go to “Launchpad - System settings – Bluetooth” to turn on the switch, then move your mouse to “Norwii Presenter” or “Norwii + Model” (like Norwii N97s) below “Nearby Devices” and click on “Connect” button to complete the Bluetooth connection.
VIII. Sharing
You can upload the local files or the URL, and then share the link to the participants through the QR code during the meeting. The participants can download the shared link by scanning the QR code.
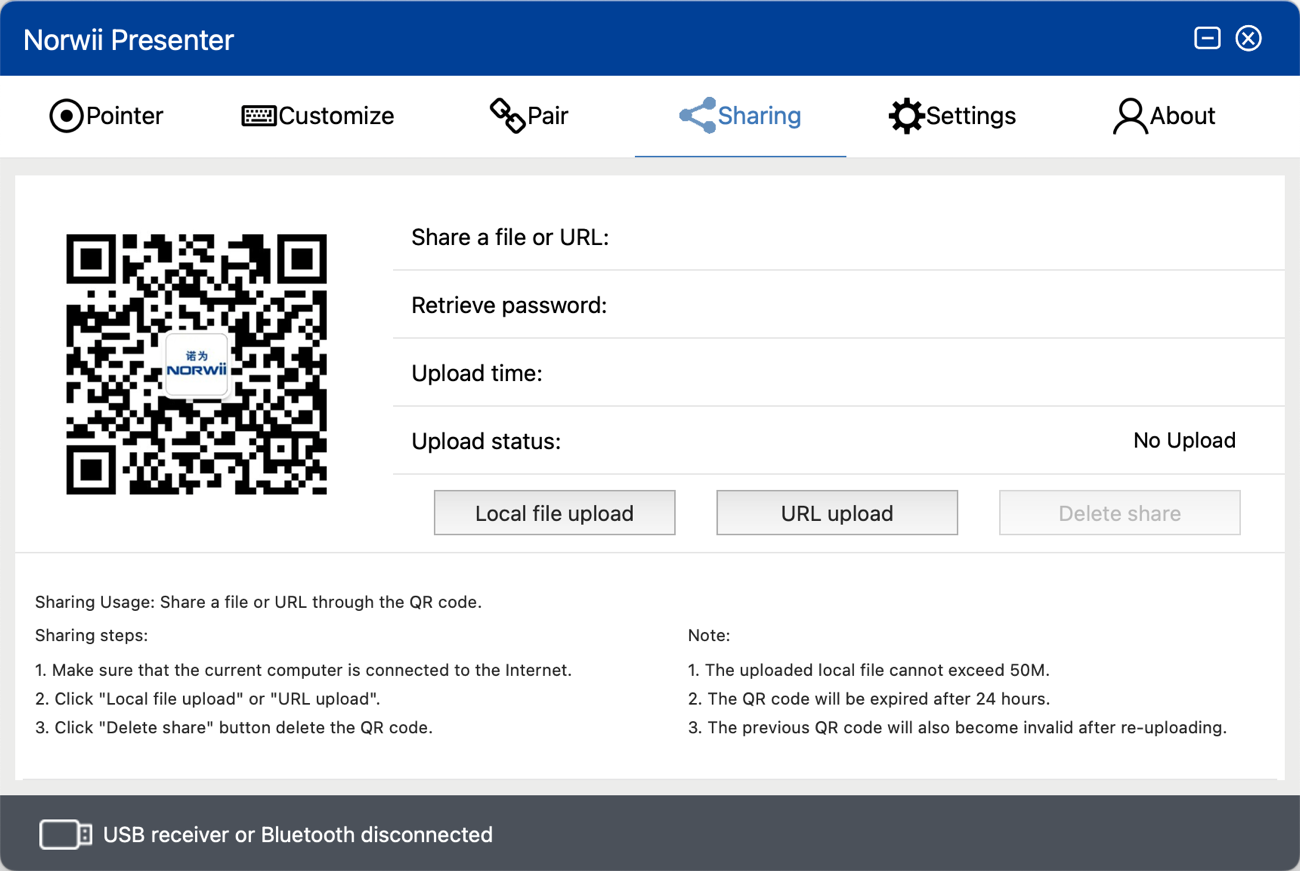
Figure 36
1. Local file upload
1) Click the local file upload button, and the system will pop up the file selection window, as shown in figure. The size of the uploaded file cannot exceed 50M.
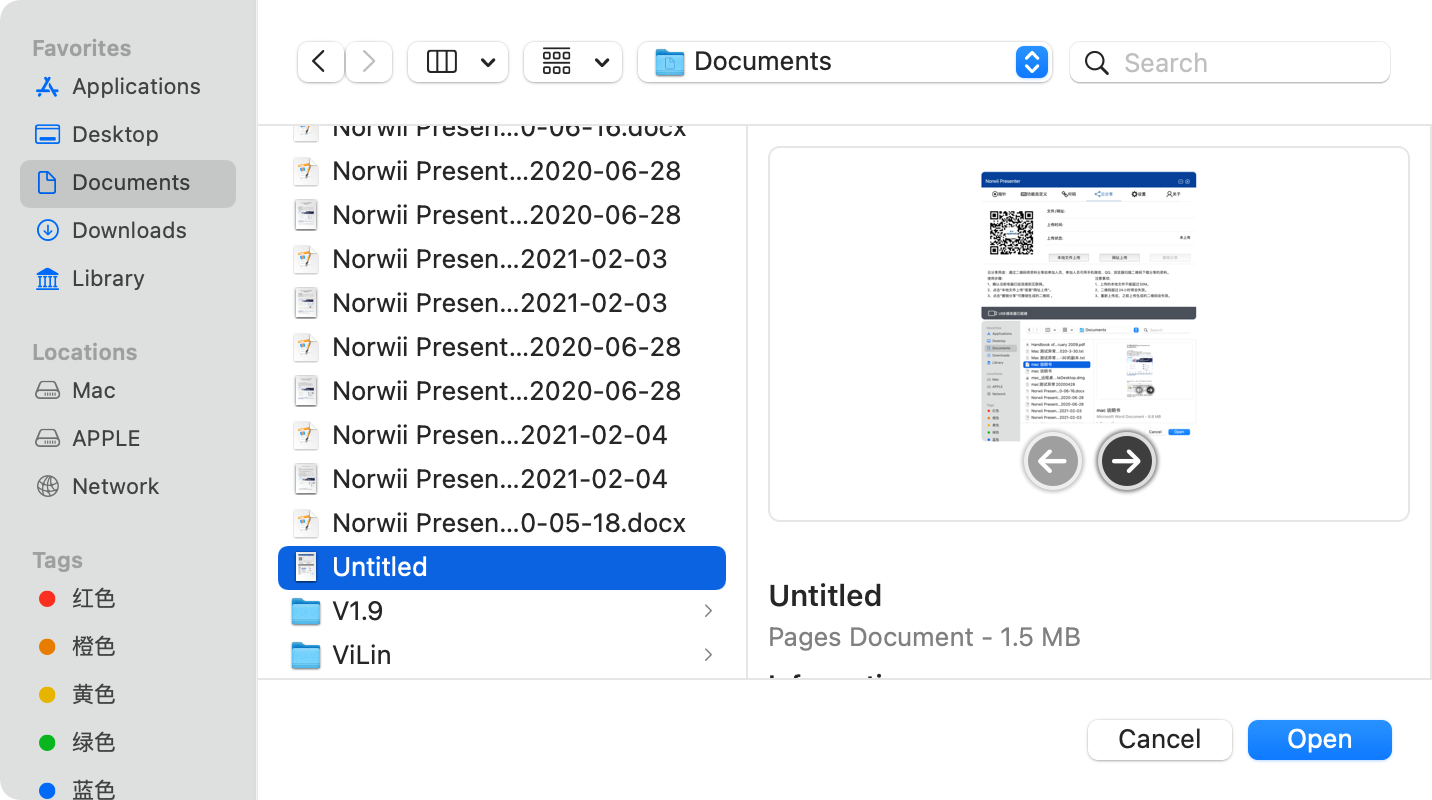
Figure 37
2) After selecting the shared local file, the Norwii Presenter will upload it to the server and generate a QR code, as shown in following figure. Conference participants can scan the QR code for downloading. The QR code is valid for 24 hours, and the uploaded file will also be automatically deleted after the link expires.

Figure 38
2. URL upload
1) If a URL is going to be shared, click the URL upload button, input the corresponding URL and retrieve password, as shown in the figure. A valid URL must start with http:// or https://.

Figure 39
2) After filling in the URL information, a QR code will also be generated, as shown in the following figure. Conference participants can scan the QR code for downloading, and the QR code is valid for 24 hours.
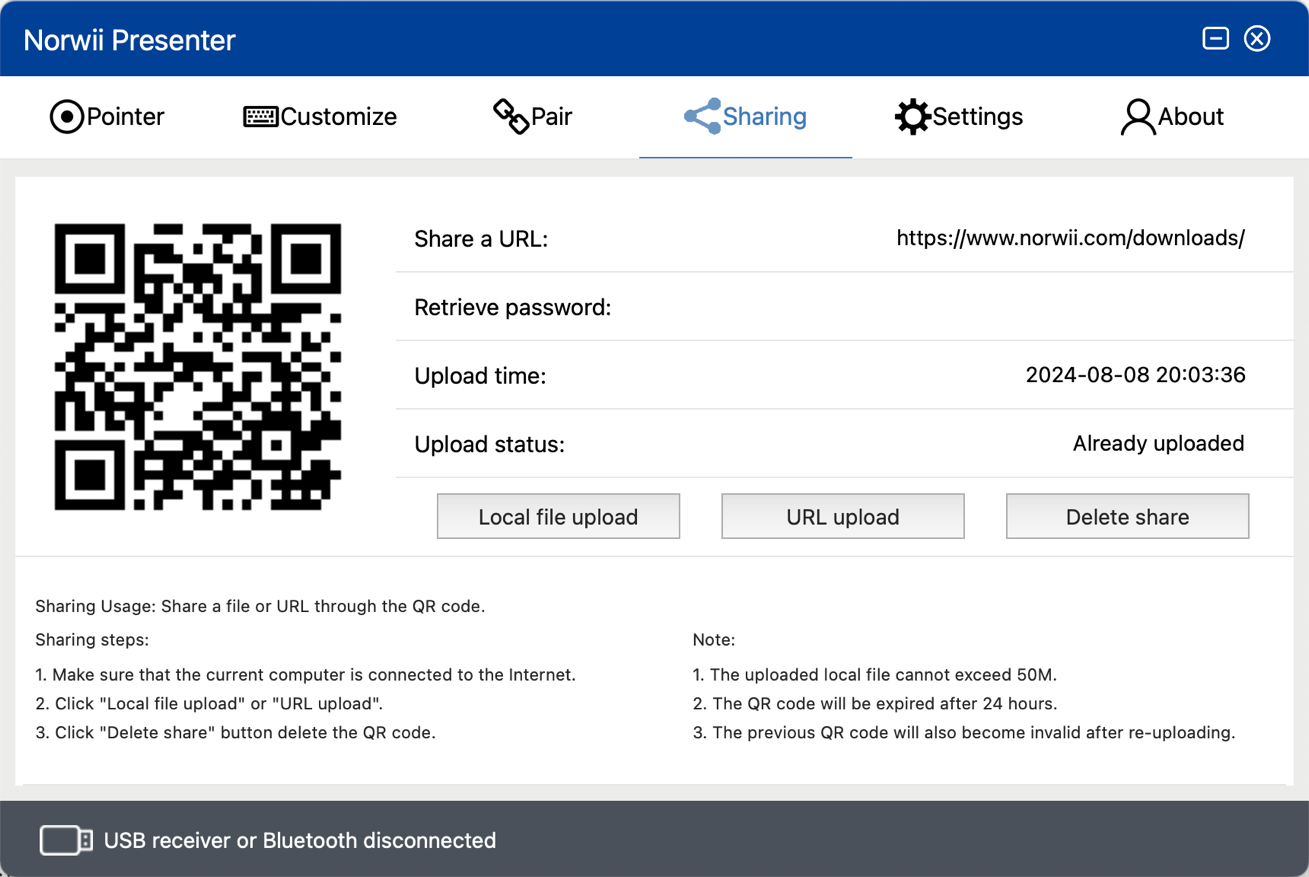
Figure 40
3. Delete share
If the shared information needs to be deleted, click the Delete share button, and the corresponding files on the server will be automatically deleted.
IX. Settings
It supports the setting of five functions: "General", "Firmware information", "Annotate Key", and "Timer", as shown in the figure.
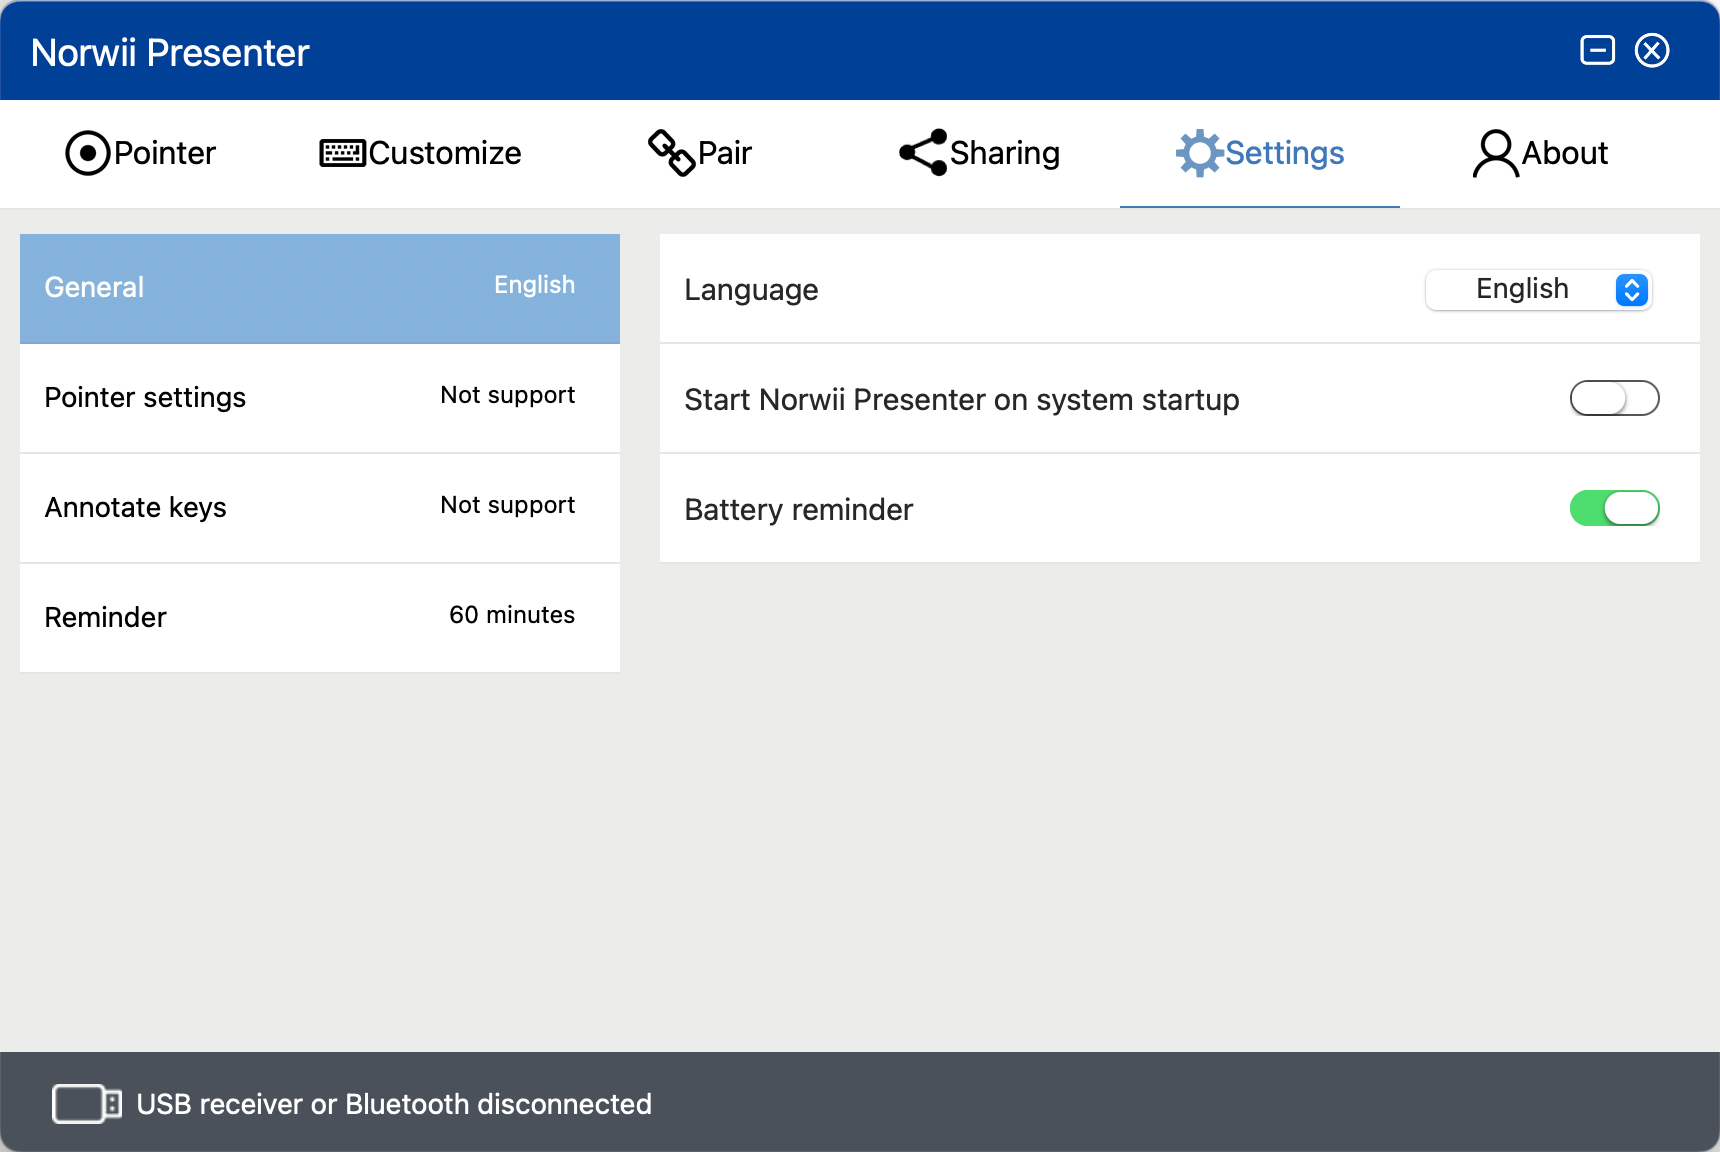
Figure 41
1. General, as shown in the following figure.
1) Language: including simplified Chinese, English, Korean and Japanese, users can choose according to their own needs; When the Norwii Presenter software is opened for the first time, it will choose its own display language according to the display language of the operating system. If the user makes a modification, the corresponding language will be displayed according to the user's selection.
2) Start Norwii Presenter on system startup: When it is turned on, the software will start synchronously after the computer starts, without manually clicking to open; When it is off, the Norwii Presenter will not start automatically and requires the user to manually open it.
3) Battery reminder: If the switch is on, it will vibrate to alert the user in case of low voltage or insufficient power. If the switch is off, battery reminder will be off. Only wireless presenter equipped with vibration functionality has this feature; those without vibration functionality cannot produce vibration alerts.
2. Pointer settings
Pointer setting includes six function settings, as shown in the figure.
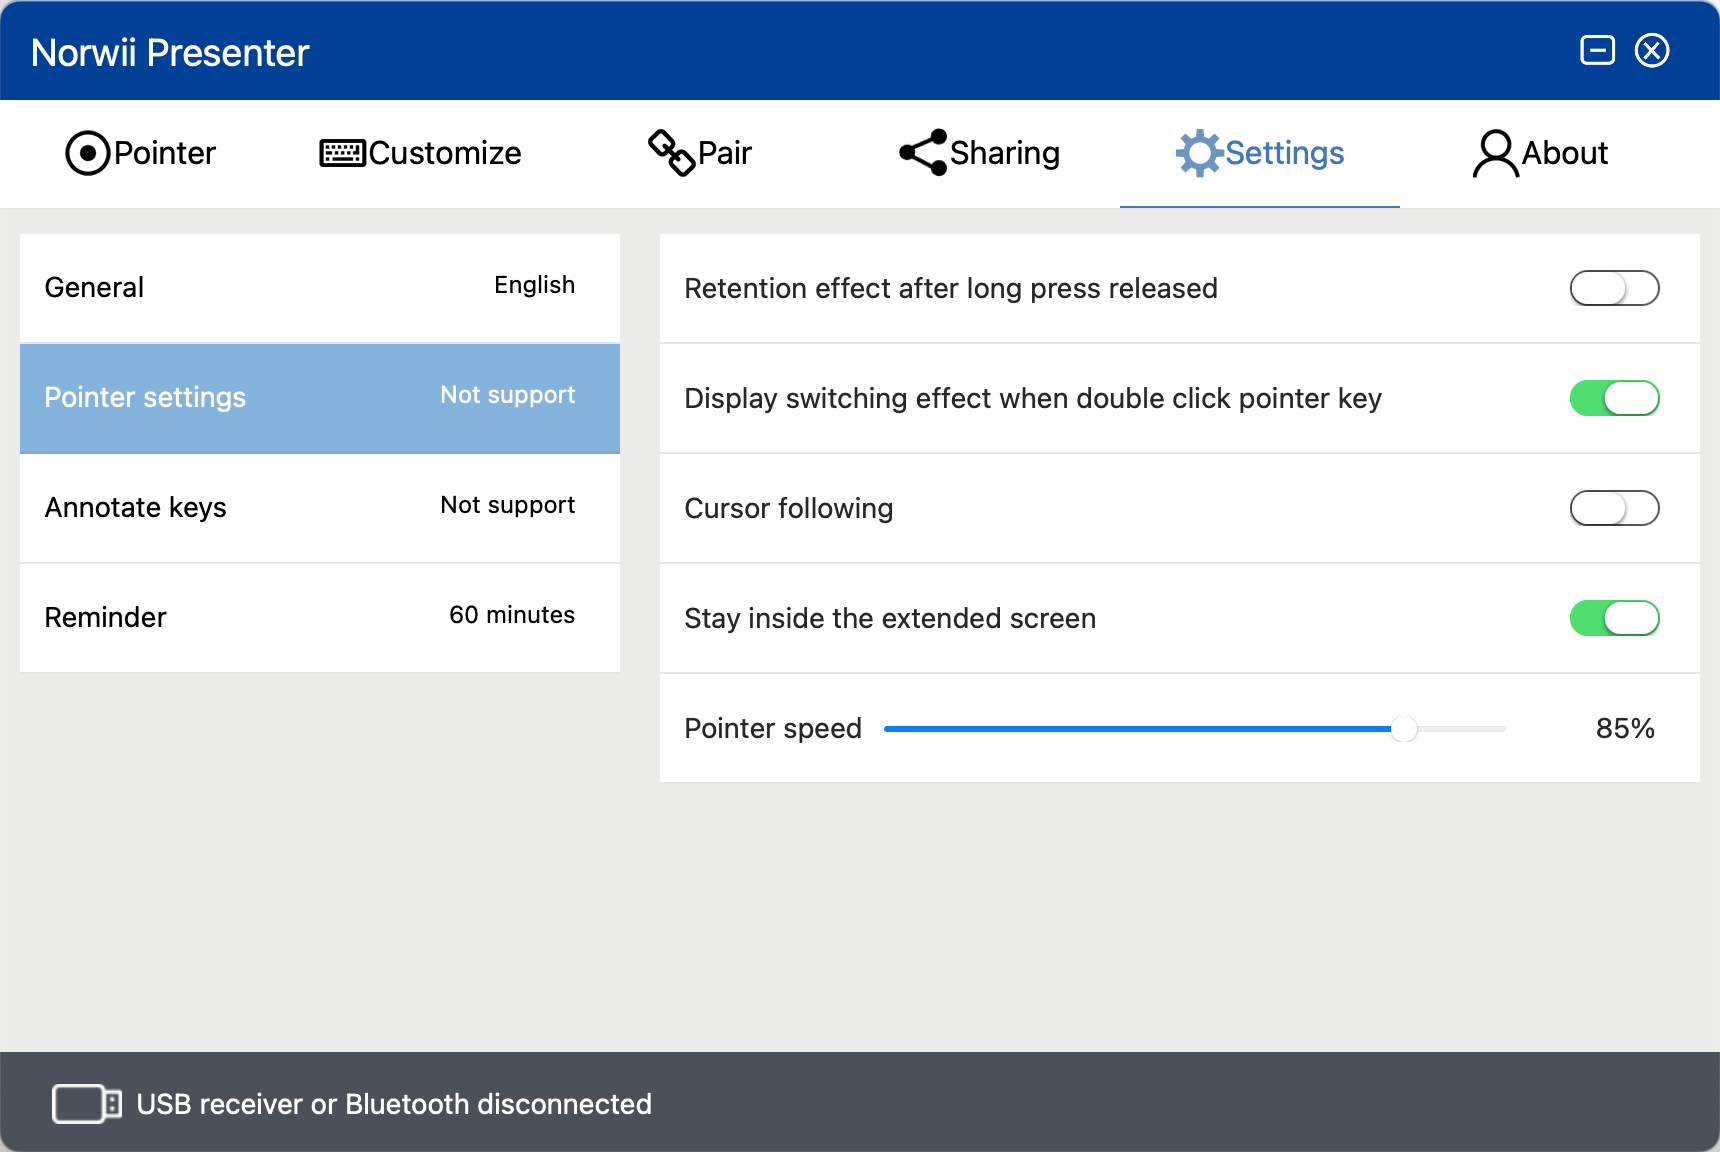
Figure 42
1) Retention effect after long press released: when it is on, for the digital laser, highlight, magnifier, customized icon, the effects of the above modes will not disappear after the long-press of the pointer key is released. The effects will remain on the screen until user press another key; When it is off, the corresponding display effect will disappear immediately after releasing the long pressing of the pointer key.
2) Display switching effect when double click pointer key: This switch is used to control whether or not to display the pointer mode that just has been switched to after double click pointer key.
3) Cursor following: If the switch is on, when the digital laser is moved, the mouse will move at the same time.
4) Stay inside the extended screen: when it is on, functions including digital laser, highlight, magnifier, customized icon will only be displayed in the extended screen (another display screen) when there is an extended screen; When it is off, the pointer can move between the main screen and the extended screens; This option is on by default.
5) Pointer Speed: You can adjust the moving speed of pointer.
3. Annotate keys, as shown in the figure.
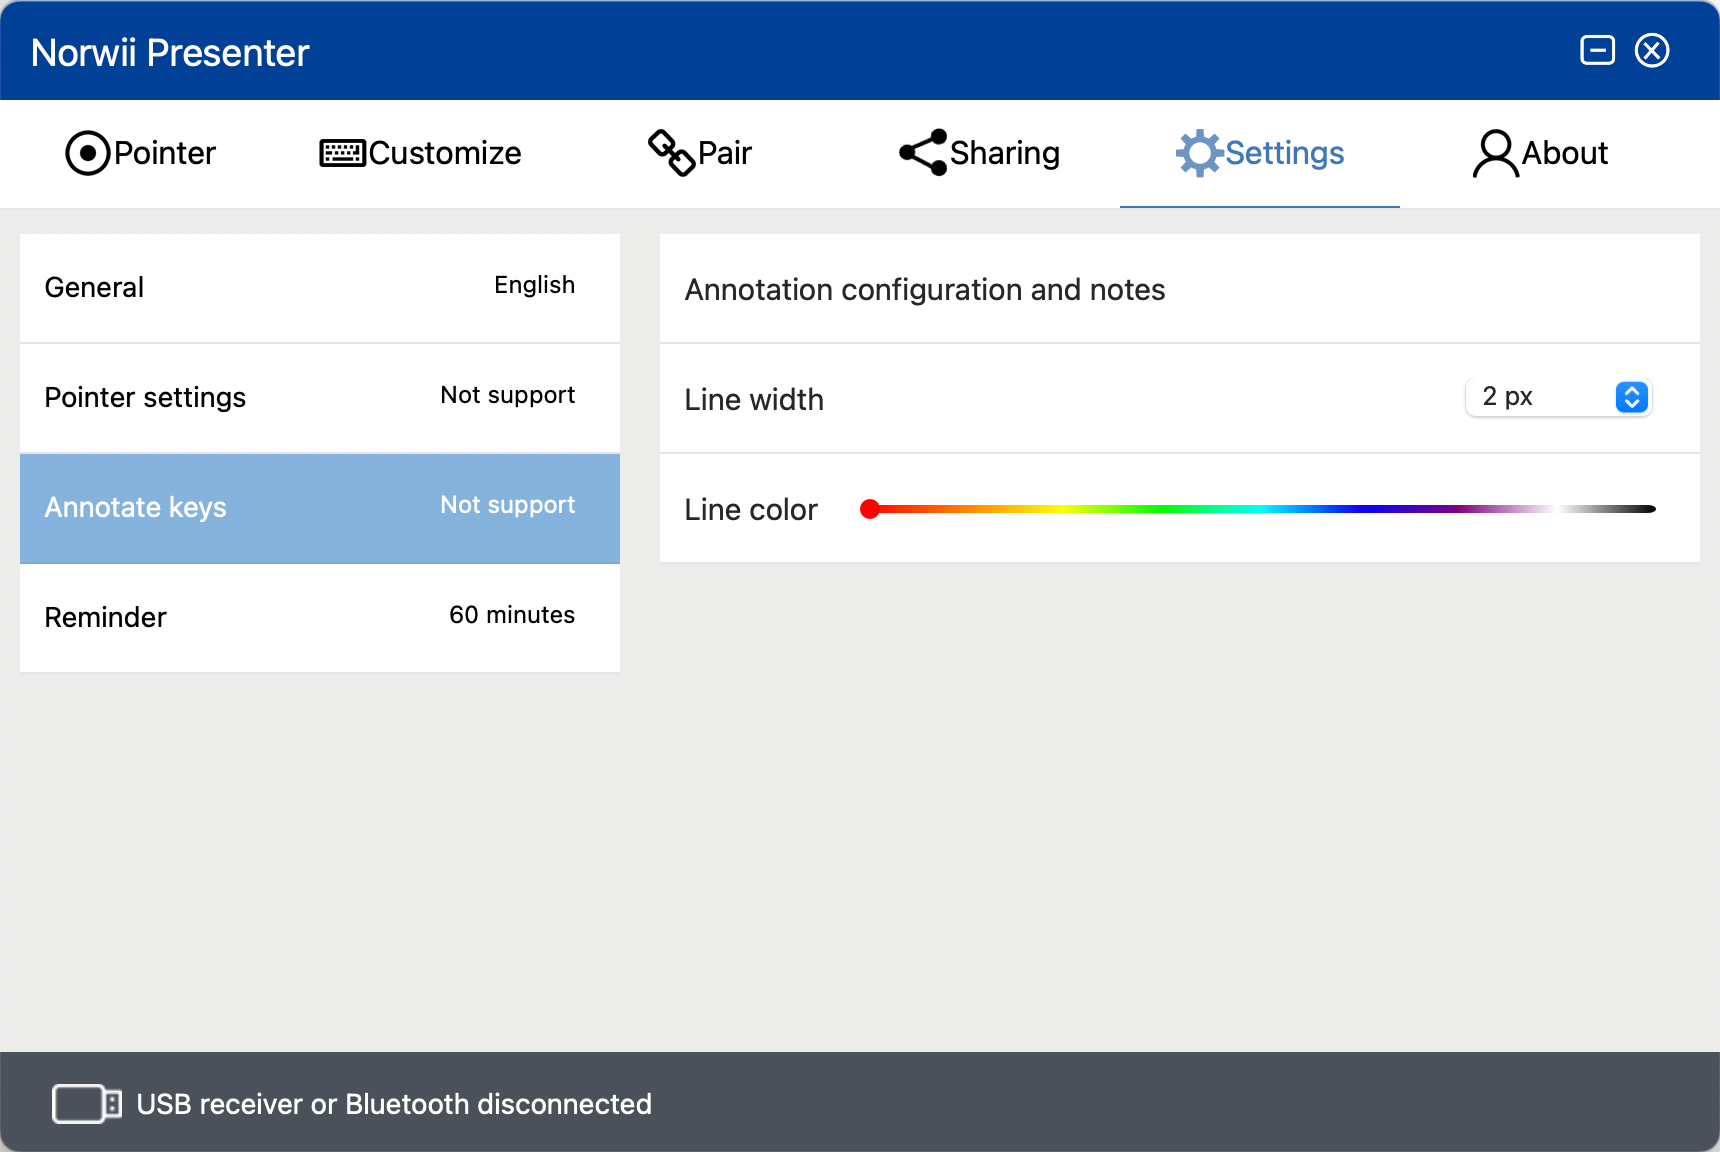
Figure 43
1) Line width: Line width includes five thicknesses from 1px to 5px, users can choose according to their needs.
2) Line color: adjust the color of the line, users can adjust it according to their needs.
4. Reminder
1) Timer
Display a timer or clock on the main screen (not the extended screen) to help users keep the time when playing slides. If the user use mirror or duplicated screen (the main screen and the expansion screen have the same content), the timer will display on both screens. If the user use extend screen, the time will display on main screen. For some of the Highlight series wireless presenter with vibration, the wireless presenter vibrates to alert the user when the time is about to end. Users can choose the predefined time or custom time, as shown in the figure.
The wireless presenter will vibrate at the last 10 minutes, 5 minutes, 0 minutes of the countdown.
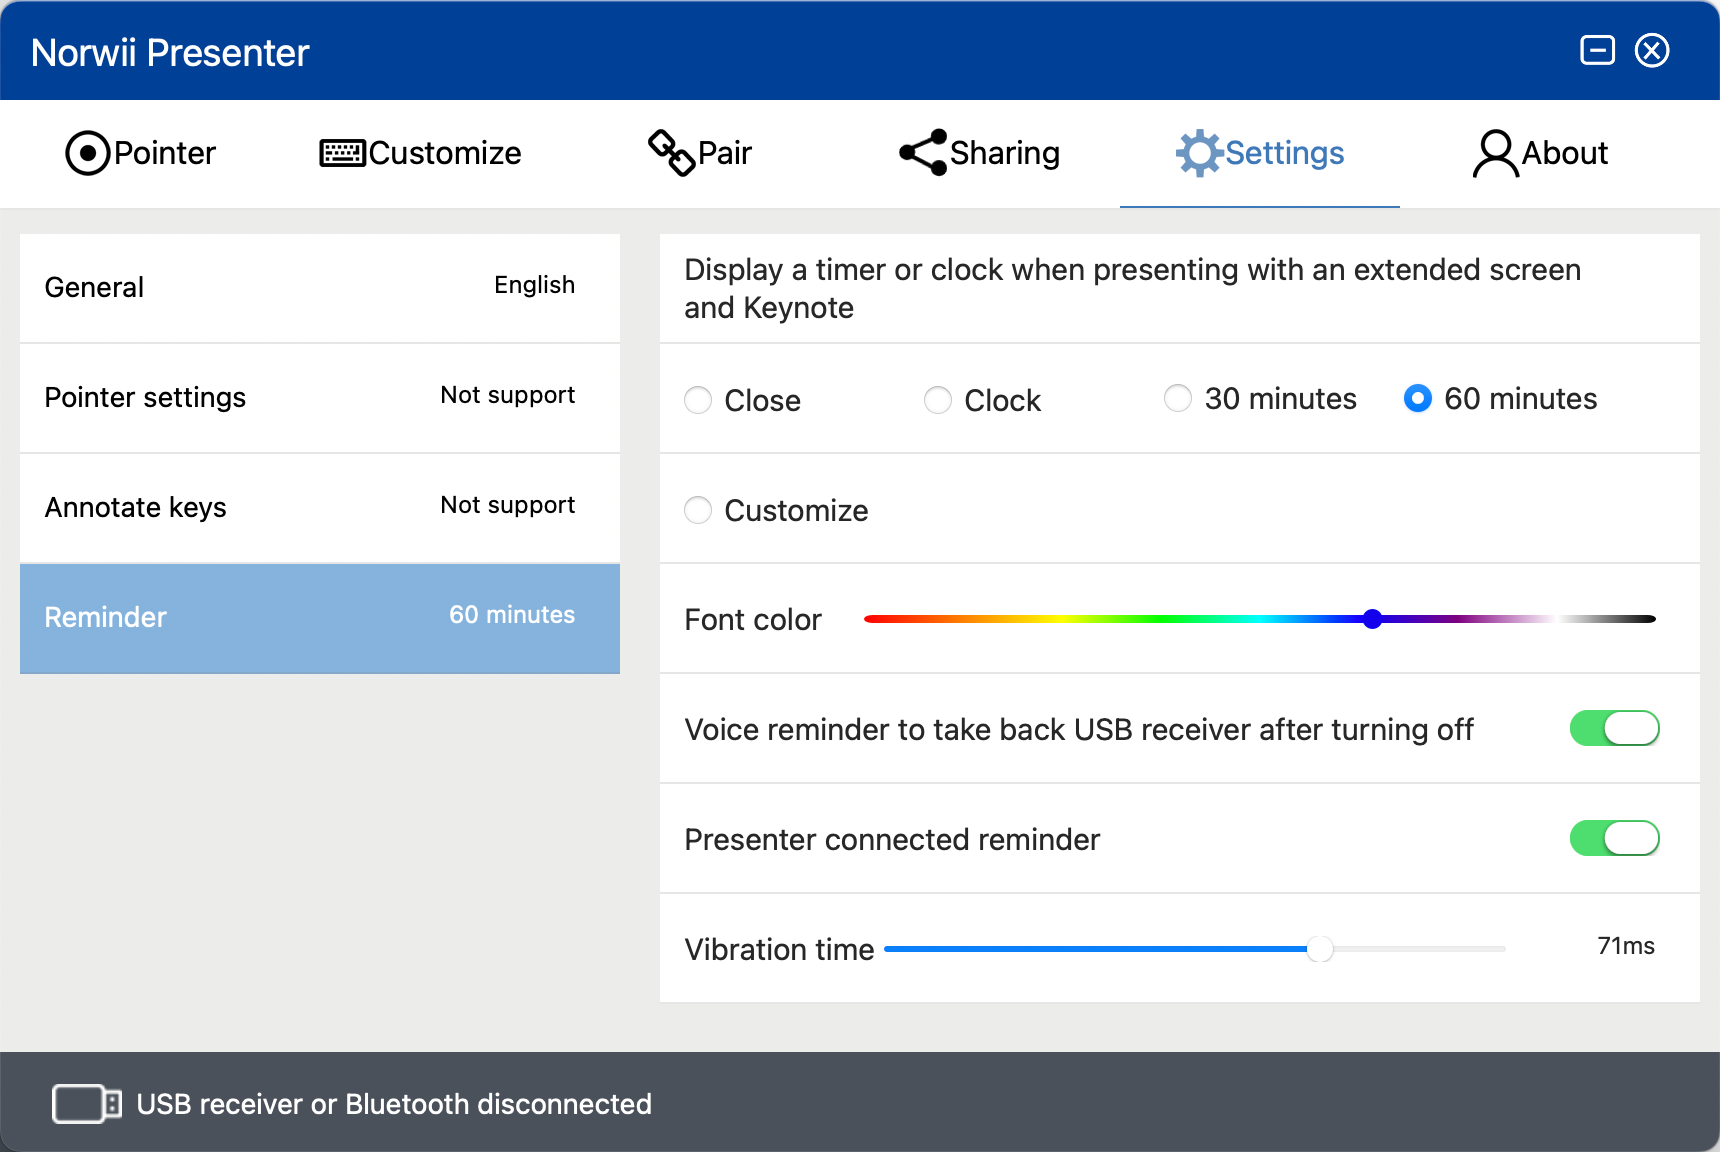
Figure 44
2) Voice reminder to take back USB receiver after turning off: If the USB receiver is inserted into the computer USB port, and the wireless presenter is turned off or the wireless presenter is far away from the USB receiver, the software will remind the user to take back the USB receiver by voice. Voice alerts to use your computer's current volume Settings. If the volume of the computer is too low or mute, the user will not hear the voice alert.
3) Presenter connected reminder: Vibration reminder when the wireless presenter is connected successfully: When it is on, every time the wireless presenter and the USB receiver are connected successfully, it will vibrate to remind; This option is turned off by default.
4) Vibration time: refers to the vibration duration of the wireless presenter when the vibration reminder function is enabled, in milliseconds.
X. About
Contains online tutorials, the software current version, software update, Privacy & Security settings, firmware version and update, contact QR code and other content, as shown in the figure.
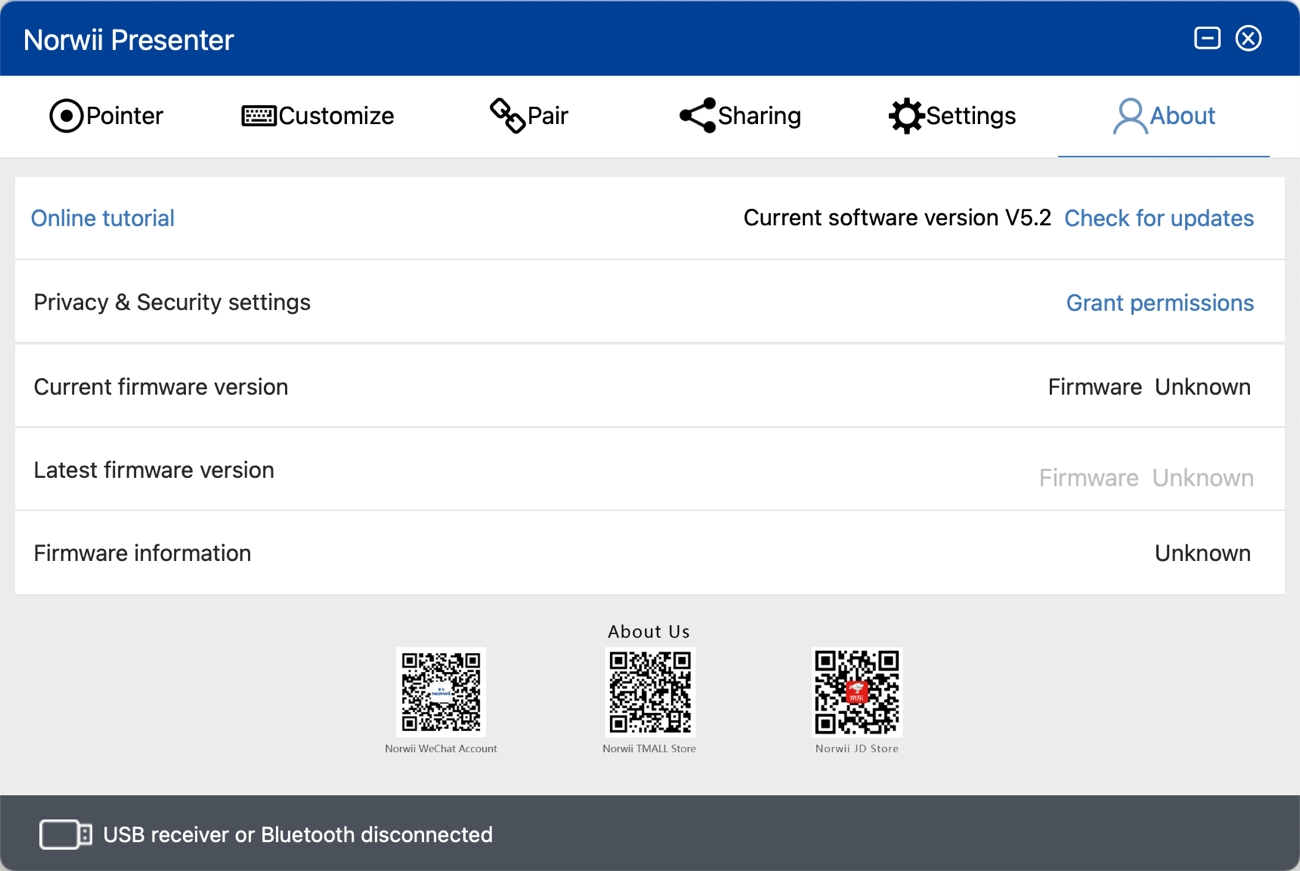
Figure 45
1. Online tutorial is the online version of this document.
2. Software update: If the Norwii Presenter software needs to be updated, there will be a red dot reminder above the “Check for updates”. Click “Check for Updates” to obtain and update the latest software.
3. Firmware information:The firmware information displays the current firmware version and the latest firmware version. If an update is ready, the software will automatically prompt, as shown in the figure.
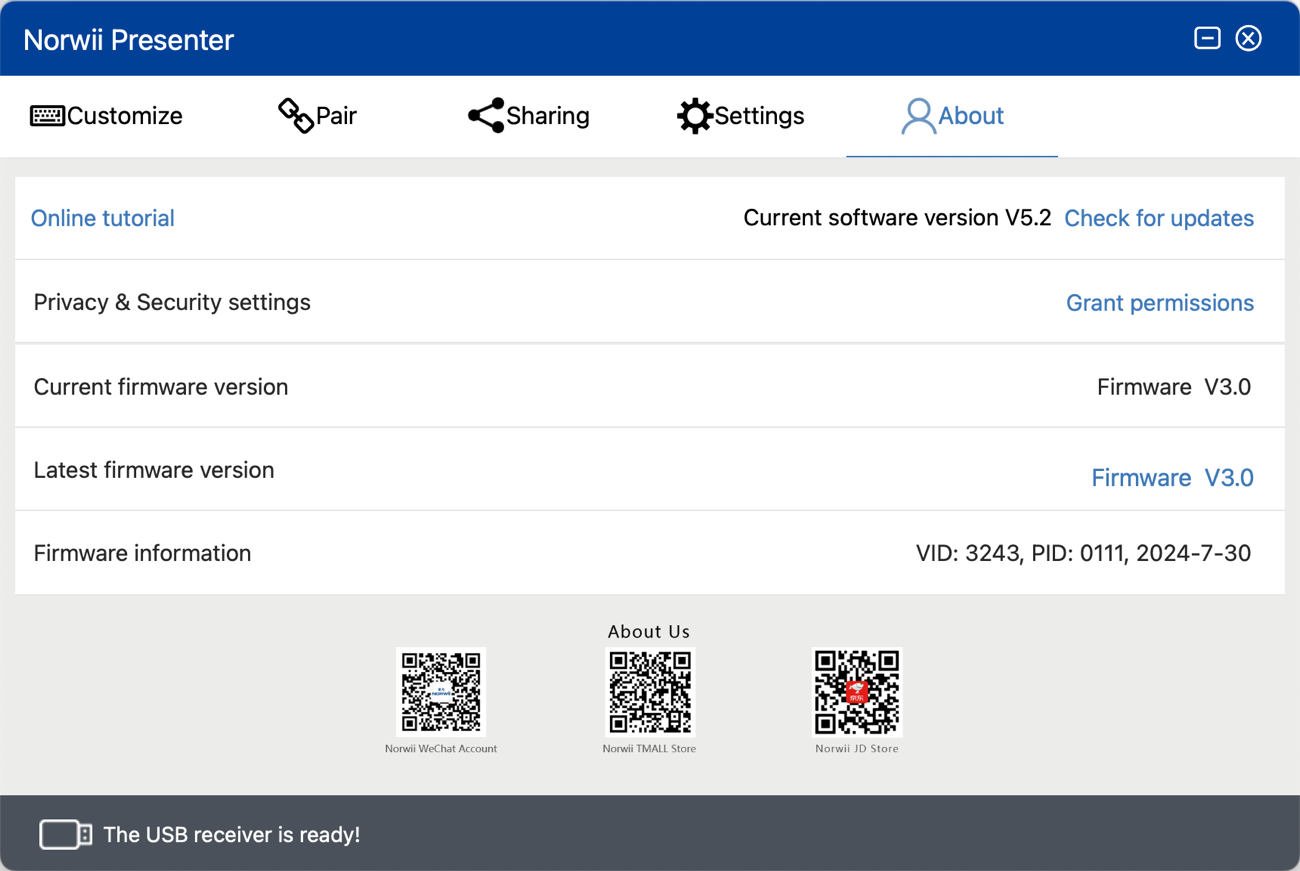
Figure 46
Not all USB receivers support firmware updates. Only some receivers produced in the second half of 2019 started to support firmware updates.