Download the PDF format of this manual:
1. ![]() N95s BLE Multi-language manuals.pdf
N95s BLE Multi-language manuals.pdf
2. ![]() N95s BLE Wireless Presenter User Manual Norwii (1mW or 5mW).pdf
N95s BLE Wireless Presenter User Manual Norwii (1mW or 5mW).pdf
4. ![]() Software and System Settings_III.pdf
Software and System Settings_III.pdf
5. ![]() Troubleshooting III (EN).pdf
Troubleshooting III (EN).pdf
Be sure to read this user manual carefully before using the wireless presenter and keep it for future reference.
This product can generate laser beam. DO NOT STARE INTO BEAM OR EXPOSE USERS OF TELESCOPIC OPTICS. Do not shine the laser beam on people's or animal’s eyes to avoid eye damage! Do not give this product to children as a toy!
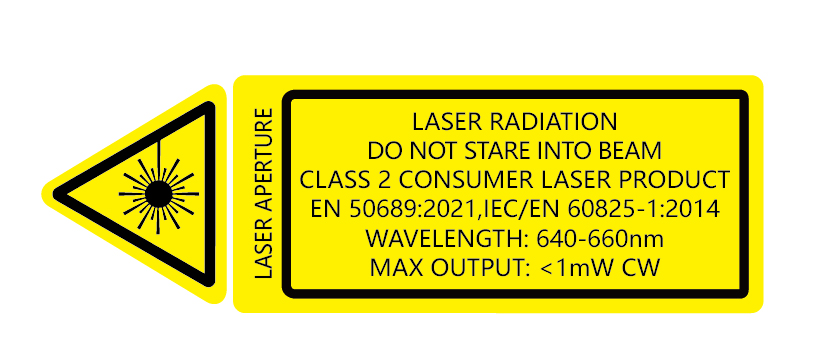
Warning label for red laser product (See below figure):


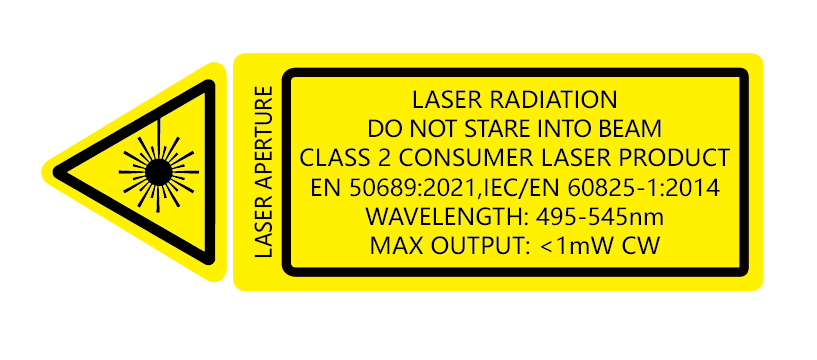
Warning label for green laser product (See below figure):


I. Safety warning
1. Please refer to the manual to use this product correctly.
2. This product is equipped with a built-in lithium battery, and it is prohibited to disassemble, collide, squeeze or throw the product into fire; Stop using the product if the battery is swollen.
3. Do not place the product in a high-temperature environment.
4. Do not immerse this product in water or any other liquid.
5. If short circuit fault occurs, do not continue using or disassemble without authorization. Please contact Norwii for assistance.
II. Instructions before use
1. Before using this product, please switch the input method of your computer to English input mode.
2. Please firstly run Norwii Presenter software on your computer to experience all the features of this product. Please visit Norwii official website www.norwii.com, then go to the "Software Download" page under the "Service and Support" to download Norwii Presenter software.
3. On Apple's macOS, the Norwii Presenter software requires three permissions: Accessibility, input monitoring, Screen & System Audio Recording. If it has not been set before, please click "Grant Permissions" in the "About" tab of the Norwii Presenter software, and then open the corresponding permission settings in the window that opens. You can also check the box in front of the Norwii Presenter software in the above three permission settings in the "Launchpad - System settings – Privacy & Security – Accessibility, input monitoring, Screen & System Audio Recording" of macOS.
III. Connection Methods
The Wireless Presenter has two connection methods: one is to connect to the computer via a USB receiver, which supports both USB-A and USB-C (also known as Type-C) interfaces; the other is to connect to the computer via Bluetooth.
1. The wireless presenter can be connected to a computer via a USB receiver.
There are 3 types of USB receivers:①dual-head receiver, it contains two connectors, USB-A and USB-C, and has no USB flash drive; ②USB-A connector, it may have an internal USB flash drive; ③USB-C connector, it may have a USB flash drive inside. There is only one type of receiver in a package, not two or more USB receivers at the same time. Which specific type of USB receiver depends on the choice made at the time of purchase.
1) Turn on the wireless presenter power switch and remove the USB receiver from the end of the wireless presenter.

2) Plug the USB receiver into the USB port of your computer, ‘New Hardware Found’ will be displayed on the lower right corner of the computer desktop, and Windows will automatically install the driver. When Windows displays ‘New Hardware Installed and Ready’, it means the USB receiver installation is complete, and then you can control your computer through the wireless presenter.
1. Bluetooth connection on Windows computer.
1) Turn on the Bluetooth switch on your computer, click Add Device, and select Bluetooth for the device type.
2) Turn off the power of the wireless presenter, press and hold the page up key of the wireless presenter, and at the same time turn on the power switch of the wireless presenter, and then release the page up key of the wireless presenter, at this time, the display of the wireless presenter shows “ ![]() ” for 3 minutes which means that Bluetooth is waiting for pairing.
” for 3 minutes which means that Bluetooth is waiting for pairing.
3) Find Norwii N95s BLE in Add Device on your computer, click Connect, after successful connection, the “ ![]() ” in the display of the wireless presenter will disappear, and it will show Norwii N95s BLE is connected in “Bluetooth & Device” on your computer. Then you can control your computer through the wireless presenter.
” in the display of the wireless presenter will disappear, and it will show Norwii N95s BLE is connected in “Bluetooth & Device” on your computer. Then you can control your computer through the wireless presenter.
2. Bluetooth connection on macOS computer.
1) Select Bluetooth in the “System Settings” of your computer and turn on the Bluetooth switch.
2) Turn off the power of the wireless presenter, press and hold the page up key of the wireless presenter, and at the same time turn on the power switch of the wireless presenter, and then release the page up key of the wireless presenter, at this time, the display of the wireless presenter shows “ ![]() ” for 3 minutes, which means that Bluetooth is waiting for pairing.
” for 3 minutes, which means that Bluetooth is waiting for pairing.
3) Find Norwii N95s BLE in “Nearby Devices” on your computer, click Connect, the “ ![]() ” in the display of the wireless presenter disappears, and it shows Norwii N95s BLE is connected in My Devices on your computer. Then you can control your computer through the wireless presenter
” in the display of the wireless presenter disappears, and it shows Norwii N95s BLE is connected in My Devices on your computer. Then you can control your computer through the wireless presenter
3. Priority of USB receiver and Bluetooth connection.
USB receivers have higher priority than computer Bluetooth. After connecting the wireless presenter to the computer via Bluetooth, plug in the USB receiver, and the wireless presenter will disconnect from the computer via Bluetooth and establish a connection with the USB receiver. Pull out the USB receiver, and the wireless presenter will automatically connect to the computer via Bluetooth. The wireless presenter cannot be paired with computer via Bluetooth while the USB receiver is plugged in.
4. Bluetooth wireless presenter and device reconnection.
The Bluetooth presenter can only store the identification information of the last paired device (such as a computer, iPad, or mobile phone). Each time the presenter is turned on, it will automatically connect to the last connected device.
III. Bluetooth connectivity

IV. Specifications
Transmitter
Technology:Radio frequency
Frequency:2.4GHz
Control Distance:100 meters
Laser Power:<1mW (Class 2) or <5mW (Class 3R), see the laser label on the back of the presenter.
Laser Distance:>200m
Wavelength:Red 640-660nm
Wavelength:Green 495-545nm
Battery capacity:300mAh lithium battery
Charging Voltage:5V
Charging Current:0.3A(Max)
Working Voltage:3.6-4.2V
Dimension:132*29.5*13.2mm
Weight:33g
USB Receiver
Working Voltage:4.5-5.5V
Dimension:36.3*15.7*3.9mm
Weight:3.5g
V. Function map

1. Power switch.
push up to “ON” to turn on the presenter, push down to “OFF” to turn off the presenter.
2. Page up key![]() .
.
click to page up, long press to play slides from the current page. Long press again to end slide show.
3. Page down key![]() .
.
click to page down, long press to enter black screen, long press again to exit black screen.
4. Mouse key![]() .
.
click for mouse left button click; press and hold to move the mouse; double-click for mouse left button double-click.
5. Pointer Key![]() .
.
1) With Norwii Presenter software running, double-click to toggle to the following functions:
Digital laser mode:Press and hold ![]() to activate the default red aperture. Hold down
to activate the default red aperture. Hold down ![]() and click
and click ![]() or
or ![]() at the same time to change the aperture size.
at the same time to change the aperture size.
Magnifier mode: Press and hold ![]() to activate the magnifier. Hold down
to activate the magnifier. Hold down ![]() and click
and click![]() or
or ![]() at the same time to change the magnifier size.
at the same time to change the magnifier size.
Highlight mode: Press and hold ![]() to activate the spotting circle to highlighting what is inside the circle. Hold down
to activate the spotting circle to highlighting what is inside the circle. Hold down ![]() while clicking
while clicking ![]() to change the circle size.
to change the circle size.
Air mouse mode:Clicking ![]() equals the right mouse function. Holding
equals the right mouse function. Holding ![]() to move the mouse.
to move the mouse.
Customize icon mode: Press and hold ![]() to display the mouse pointer image. You can upload personalized pointer images in png, bmp, jpg, and gif formats. Hold down
to display the mouse pointer image. You can upload personalized pointer images in png, bmp, jpg, and gif formats. Hold down ![]() and click
and click ![]() or
or ![]() at the same time to change the size of the pointer image.
at the same time to change the size of the pointer image.
Physical laser mode: Press and hold ![]() to activate the physical laser beam and release to turn off.
to activate the physical laser beam and release to turn off.
2) Without Norwii Presenter software running, the Pointer Key has only two modes: a presentation mode and a physical laser mode, which are toggled by double-clicking on ![]() .
.
Presentation mode: clicking has no function. Long press in PowerPoint full screen mode to use PowerPoint's built-in laser pen feature.
Physical laser mode: Press and hold ![]() to activate the physical laser beam and release to turn off.
to activate the physical laser beam and release to turn off.
6. Mark key![]() .
.
Click to enter the marking state, move the pen to the place where you need to mark, press and hold ![]() , and move the wireless presenter to draw lines and circles on the screen, release
, and move the wireless presenter to draw lines and circles on the screen, release ![]() to stop drawing lines.
to stop drawing lines.
7. Erase/Volume Key![]() .
.
Click to erase the markup on the screen. Press and hold for 1 second and then move the wireless presenter up or down to adjust the computer volume.
8. Display.
1) Unconnected Status: If the Wireless Presenter is not connected to the USB receiver or Bluetooth, the Wireless Presenter's display will show the unconnected status when the Wireless Presenter is powered off and powered on again, as shown in the figure below:

2) Wireless Presenter Disconnected Status: When the wireless presenter has been connected normally, if you unplug the USB receiver or turn off the Bluetooth of your computer, the display of the wireless presenter will show the disconnected status, as shown in the figure below:

3) Bluetooth Waiting for Pairing Status: Turn off the power of the wireless presenter, press and hold![]() while turning on the presenter, and then release
while turning on the presenter, and then release ![]() , the wireless presenter display will show waiting for pairing status, as shown in the figure below:
, the wireless presenter display will show waiting for pairing status, as shown in the figure below:

4) Signal Strength: The signal strength on the display is divided into five levels, with five levels being full, indicating the strongest signal. The lower the number of signal levels, the weaker the control signal. You can judge the current using environment and control distance by the signal strength. The figure below shows a signal of three levels.

5) Key indication: A finger symbol is displayed on the display when you press the key. as shown in the figure below:

6) Battery Status: The battery icon shows the percentage value of the remaining battery level. The lightning symbol “⚡” is shown when charging and the percentage value is updated in real time. When the battery is fully charged, the battery icon will show “100”, as shown in the figure below:

9. Display Time.
This wireless presenter comes with a timing module, which can accurately time and show the time through the display. If the display time does not match the reality when using the wireless presenter, you can correct it by following steps:
1) Connect the presenter to the USB receiver.
2) Run the Norwii Presenter software on your computer.
3) Enter the [Settings] tab of the software and select “Reminder Settings”
4) Enable the function of “For wireless presenters with OLED screen, synchronize time with the computer”.
5) Turn off the wireless presenter and turn on again to synchronize the time.
10. Countdown Reminder.
1) Set countdown via the wireless presenter:
a) First turn off the wireless presenter, press and hold the pointer button, then turn on the wireless presenter, the wireless presenter will enter the countdown setting mode, a digital 00:00 will flash on the display, as shown in the figure below:

b) When in countdown setting mode, click or long press the page up/down key to set the countdown time.
Short press: Increase or decrease the countdown time by 1 minute.

Long press: Increase or decrease the countdown time by 5 minutes.

c) Starting the countdown:
The wireless presenter will automatically end setting and start counting down if there is no operation in 5 seconds. The wireless presenter will remind you by vibrating 0.5 seconds at 10 minutes, 5 minutes, and 0 minutes before the end of the countdown.
Turning off and on will not terminate the countdown within the countdown time. When the countdown time is exceeded, the countdown end and the display will return to the clock.
2) Set countdown via Norwii Presenter software:
Run the software, select “Reminder” in the “Settings” tab of the software, and then select the predefined time option or input customized time. After setting up, a timer window will be displayed, click to start countdown. The screen timer can be reset, repositioned and resized, and redefined the color, as shown in the figure below:


11. Function switching of the page up and down keys.
Long press ![]() and
and ![]() imultaneously to switch between the four modes.
imultaneously to switch between the four modes.
1) By default, the page up and down keys on the Bluetooth wireless presenter correspond to the left and right arrow keys on the computer keyboard, which is suitable for PowerPoint, WPS, Prezi, and Keynote.

2) The first time you press and hold both the page up and down keys on the wireless presenter simultaneously, the function will switch to the Page Up and Page Down keys on the computer keyboard. This is suitable for image-viewing software.

3) The second time you press and hold both the page up and down keys simultaneously, the function will switch to the mouse scroll wheel function. This is suitable for some short-video apps and web browsers.

4) The third time you press and hold both the page up and down keys simultaneously, the function will switch to the up and down arrow keys on the computer keyboard. This is suitable for Word, Excel, and other applications.

5) The fourth time you press and hold both the page up and down keys simultaneously, the function will switch to the default left and right arrow keys on the computer keyboard.
6) After switching, the functions are automatically stored in memory and will not change until you change it again.
12. Customize.
The product supports the customization of the key functions for the page up and page down keys, please follow the prompts on the interface of Norwii Presenter software.
VII. Certifications
CE, ROHS, FDA
FCCID: 2AXGRN95
VIII. Declaration of conformity
This laser product complies with EN 50689:2021 and IEC/EN60825-1:2014/A11:2021. Complies with 21 CFR 1040.10 and 1040.11, except for deviations pursuant to Laser Notice No.50, dated June 24, 2007.
IX. Product Support
Shanghai Norwii Technology Co., Ltd
Address: No.277 Jinfeng Road, Pudong New Area, Shanghai, 201201, China
Tel: 86-21-51872080
Email: support@norwii.com