Download the PDF format of this manual:
1. ![]() N86 Wireless Presenter User Manual Norwii (1mW or 5mW).pdf
N86 Wireless Presenter User Manual Norwii (1mW or 5mW).pdf
2. ![]() Setup on macOS computer.pdf
Setup on macOS computer.pdf
3. ![]() Trouble shooting guide - Wireless Presenter.pdf
Trouble shooting guide - Wireless Presenter.pdf
4. ![]() Compatability Guide - V2.3_20240305 Applicable models N86,N89,N99.pdf
Compatability Guide - V2.3_20240305 Applicable models N86,N89,N99.pdf
Be sure to carefully read this user's manual before using the wireless presenter and keep it for future reference
WARNING! RISK OF INJURY!
Laser beams can cause permanent damage to the eyes. Do not look into the laser beam or shine the laser beam into your eyes, other peoples’ eyes, or the eyes of pets. Be careful when pointing it towards reflective surfaces.
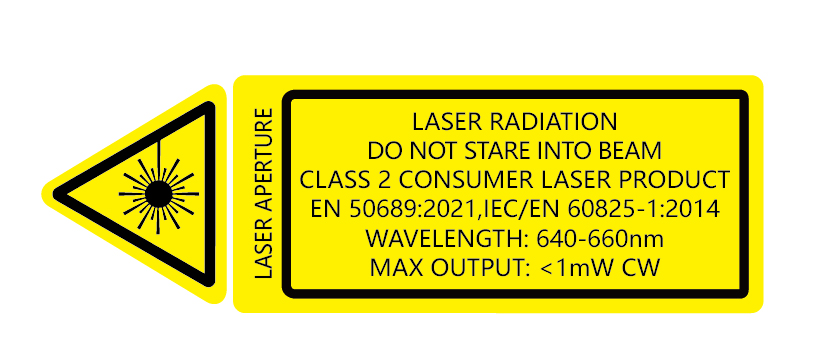
Warning label for red laser product (See below figure):


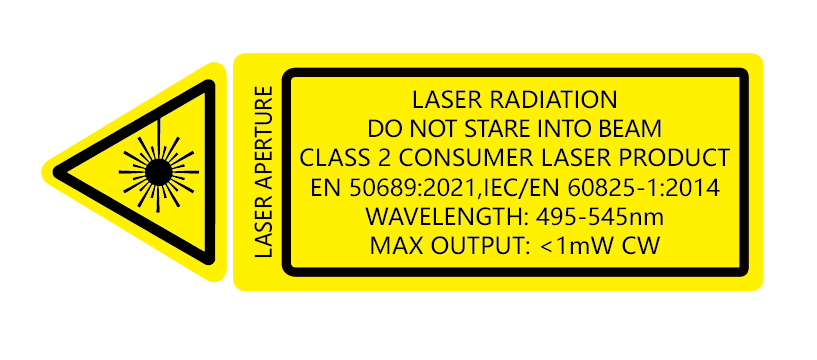
Warning label for green laser product (See below figure):


Keep this device away from Children. This is a working tool, not a toy. It should only be used by adults.
Information in this document is subject to change without notice. No part of this document may be reproduced or transmitted in any form or by any means, electronical or mechanical, for any purpose, without prior permission of the seller.
I. Features
1. Support previous page, next page. Click the page up key to go backward to previous page, long press to play slides from the current page. Click the down page key to go forward to the next page, long press to go into the black screen.
2. PowerPoint 2016, PowerPoint 2013, and PowerPoint 2016 for Mac can achieve digital laser function. In the full screen presentation state of PowerPoint files, press the laser pointer key to open the digital laser pointer inside PowerPoint.
3. Support full screen mark function, one key to mark and one key to erase the mark.
4. Support volume function, it can adjust the volume of the computer.
5. Support aerial mouse, with more flexible and precise cursor control.
6. Integrated design, the USB receiver can be easily stored in the tail of the wireless presenter, making it easy to carry.
7. Supports USB 2.0 version, use operation system universal USB driver, plug and play.
8. The page up/down keys can be customized by Norwii Presenter software. The firmware of the USB receiver is updatable.
II. Operation system
Support Windows 7/8/10/11 and macOS 10.15 or later, only support laser and page up/down on Android & Linux.
III. Package contents
1) Wireless presenter (USB receiver included)
2) User Manual
3) AAA battery*2pcs (not included)
IV. Specifications
Transmitter
Technology: Radio Frequency
Frequency: 2.4GHz
Control Distance: up to 50m
Laser Power: <1mW(Class 2) or <5mW(Class 3R), see the laser label on the back of the presenter.
Laser Distance: >200m
Wavelength: 640-660nm(red )or 495-545nm(green)
Battery: AAA*2pcs
Working Voltage: 3V
Sleep Current <30uA
Dimension: 143.7(L)x41.7(W)x27.5mm(H)
Weight: 46.47g
USB Receiver
Working Voltage: 4.5-5.5V
Dimension: 35.9mm(L)x 14.8mm(W) x6.5mm(H)
Weight: 2.7g
V. Function map

Attention: When using this product, please change your Input Method Editors (IME) to English input mode.
VI. Function Description
1. Power switch: push up to “ON” to turn on the presenter, push down to “OFF” to turn off the presenter.
2. Page up key ![]() :click to page up, long press to play slides from the current page. Long press again to end slide show.
:click to page up, long press to play slides from the current page. Long press again to end slide show.
3. Page down key ![]() :click to page down, long press to enter black screen, long press again to exit black screen.
:click to page down, long press to enter black screen, long press again to exit black screen.
4. Physical laser key ![]() :Press and hold to turn on the physical laser beam, and release to turn off the physical laser beam.
:Press and hold to turn on the physical laser beam, and release to turn off the physical laser beam.
5. Pointer key ![]() :PowerPoint 2016, PowerPoint 2013, and PowerPoint 2016 for Mac can achieve digital laser function. In the full screen presentation state of PowerPoint files, press the laser pointer key to open the digital laser pointer inside PowerPoint.
:PowerPoint 2016, PowerPoint 2013, and PowerPoint 2016 for Mac can achieve digital laser function. In the full screen presentation state of PowerPoint files, press the laser pointer key to open the digital laser pointer inside PowerPoint.
6. Air mouse key ![]() :Press the air mouse key to move the cursor freely. Press the air mouse key again to stop the cursor movement.
:Press the air mouse key to move the cursor freely. Press the air mouse key again to stop the cursor movement.
7. Left mouse key ![]() :Equivalent to the function of a computer's left mouse key.
:Equivalent to the function of a computer's left mouse key.
8. Right mouse key ![]() :Equivalent to the function of a computer's right mouse key.
:Equivalent to the function of a computer's right mouse key.
9. Mark key ![]() :Click to enter the mark state, move the cursor to the desired location, hold down the mark key
:Click to enter the mark state, move the cursor to the desired location, hold down the mark key ![]() , and move the wireless Presenter to freely draw lines and circles on the screen. Release the mark key
, and move the wireless Presenter to freely draw lines and circles on the screen. Release the mark key ![]() to stop drawing.
to stop drawing.
10. Eraser/Volume key ![]() :click the Eraser/Volume key
:click the Eraser/Volume key ![]() , you can erase the marks, and long press Eraser/Volume key
, you can erase the marks, and long press Eraser/Volume key ![]() , more than 1 second, then move the wireless presenter up or down, the volume will be increased or decreased.
, more than 1 second, then move the wireless presenter up or down, the volume will be increased or decreased.
11. Function switching of the page up and down keys.
Long press![]() and
and![]() imultaneously to switch between the four modes.
imultaneously to switch between the four modes.
1) By default, the page up and down keys on the Bluetooth wireless presenter correspond to the left and right arrow keys on the computer keyboard, which is suitable for PowerPoint, WPS, Prezi, and Keynote.

2) The first time you press and hold both the page up and down keys on the wireless presenter simultaneously, the function will switch to the Page Up and Page Down keys on the computer keyboard. This is suitable for image-viewing software.

3) The second time you press and hold both the page up and down keys simultaneously, the function will switch to the mouse scroll wheel function. This is suitable for some short-video apps and web browsers.

4) The third time you press and hold both the page up and down keys simultaneously, the function will switch to the up and down arrow keys on the computer keyboard. This is suitable for Word, Excel, and other applications.

5) The fourth time you press and hold both the page up and down keys simultaneously, the function will switch to the default left and right arrow keys on the computer keyboard.
6) After switching the function, it will be automatically saved. When you restart the wireless presenter, you can continue to use the switched function.
12. The page up/down keys can be customized by Norwii Presenter software.
VII. Installation
1. Install the battery
The product is powered by two No. 7 AAA batteries. After opening the battery cover, put in two No. 7 AAA batteries and close the battery cover.

2. Take out the USB receiver and install.
Remove the USB receiver from the lower part of the wireless presenter, and then plug it into the USB interface of the computer. At this time, the bottom right corner of the computer desktop will display "Discovered New Hardware", and the system will automatically install the driver. When Windows displays "New hardware installed and ready to use", it indicates that the USB receiver installation is complete. The attached image is as follows:

(Take out the USB receiver)

(The USB receiver into the computer USB port)
3. Control the wireless presenter by operating the key of the flip pen.
4. Turn off the wireless presenter.
After use, please return the USB receiver to the presenter's original position and turn off the power switch to further save power. The attached image is as follows:

VIII. Frequently Asked Questions
1. How to download Norwii Presenter software and how to pair the presenter and the USB receiver?
For products that support key function customization or highlight serial products that support digital laser, highlight, magnifier, you need to download Norwii Presenter software. Please download it from the "Downloads" under the "Support" menu of Norwii official website www.norwii.com in English version.
2. How to know if the battery is out of power?
When the power is turned on, if the wireless presenter key is pressed and the LED indicator light does not indicate, it indicates that the battery is low. Please replace the AAA battery.
If the laser button is pressed and the LED indicator light is on, but the laser is not on, it indicates that the laser module is damaged and needs to be replaced.
3. What to do if the laser becomes dim?
The darkening of the laser beam is generally due to insufficient battery power, which requires timely replacement of the AAA battery. If the laser beam is still just a red dark spot after replacing the AAA battery, it indicates that the laser module is aging. Please contact us for after-sales repair.
4. Why does the computer do not detect the device when the USB receiver plugs into the PC?
Please check whether the USB works or not. You can use a USB mouse or keyboard to test the USB port. If a USB mouse or keyboard works on the USB port and the USB receiver of the presenter doesn’t work, it means the USB receiver is broken or the USB drivers is not compatible with the USB receiver.
You can try another USB port of the same computer or USB ports of another computer to check whether the USB receiver is good or not. If it works on other computer, it means the USB drivers of the computer are not compatible with the USB receiver. You need to back up your data and reinstall the OS.
5. How to calibrate?
Calibration is required when you do not move the wireless presenter, but the mouse cursor keeps moving in one direction until it stops at the edge of the screen. Another situation is when moving the product horizontally or vertically, the mouse on the computer does not move horizontally or vertically, and there is an angle between the movement direction and the horizontal or vertical direction, calibration operations need to be carried out. Simply say, when you move the product horizontally, and the mouse cursor on the computer does not move horizontally, which requires calibration. The purpose of calibration is to provide a horizontal and vertical reference for the product.
Place the product on a horizontal and stable surface, press and hold the page down key ![]() and turn on the power. The blue LED will flash to indicate entering calibration mode. At this point, release both hands and try to keep the product level as much as possible. The blue LED flashes for 3 seconds before stopping flashing, and remains on for 5 seconds before turning off, indicating that calibration is complete.
and turn on the power. The blue LED will flash to indicate entering calibration mode. At this point, release both hands and try to keep the product level as much as possible. The blue LED flashes for 3 seconds before stopping flashing, and remains on for 5 seconds before turning off, indicating that calibration is complete.
6. The laser is ok, and the USB receiver can be detected by the computer, why does the presenter control the computer?
The reason is the USB receiver doesn’t save the presenter’s address properly. You can use Norwii Presenter software to let the USB receiver to save the presenter’s address again. We also call this operation is to PAIR the wireless presenter and the USB receiver.
7. How to adjust the settings for Norwii Presenter on macOS?
On macOS, users need to add operation permissions of [Input Monitoring], [Screen Recording] and [Accessibility] for Norwii Presenter software under [System Preferences] - [Security & Privacy] - [Privacy]
IX. Certifications
CE, ROHS, FDA
FCCID: 2AXGRN95
X. Declaration of conformity
This laser product complies with EN 50689:2021 and IEC/EN60825-1:2014/A11:2021. Complies with 21 CFR 1040.10 and 1040.11, except for deviations pursuant to Laser Notice No.50, dated June 24, 2007.
XI. Product Support
Shanghai Norwii Technology Co., Ltd.
Add: 2F, Building 3, No 277, Jinfeng Road, Pudong New Area, Shanghai 201201, P. R. China
Tel: 86-21-51872080
Email: support@norwii.com